6

I've been getting messages recently that "My startup disk is almost full," and I'm quite sure I haven't used the full 250GB of my Macbook's hard drive. Using "Get Info" on Macintosh HD says that I'm using around 245GB (aka 5GB from being full), but I have no idea what could be using that much space. My home directory (with Photos, Movies, Downloads, etc.) is only around 34GB. Applications? only 11.

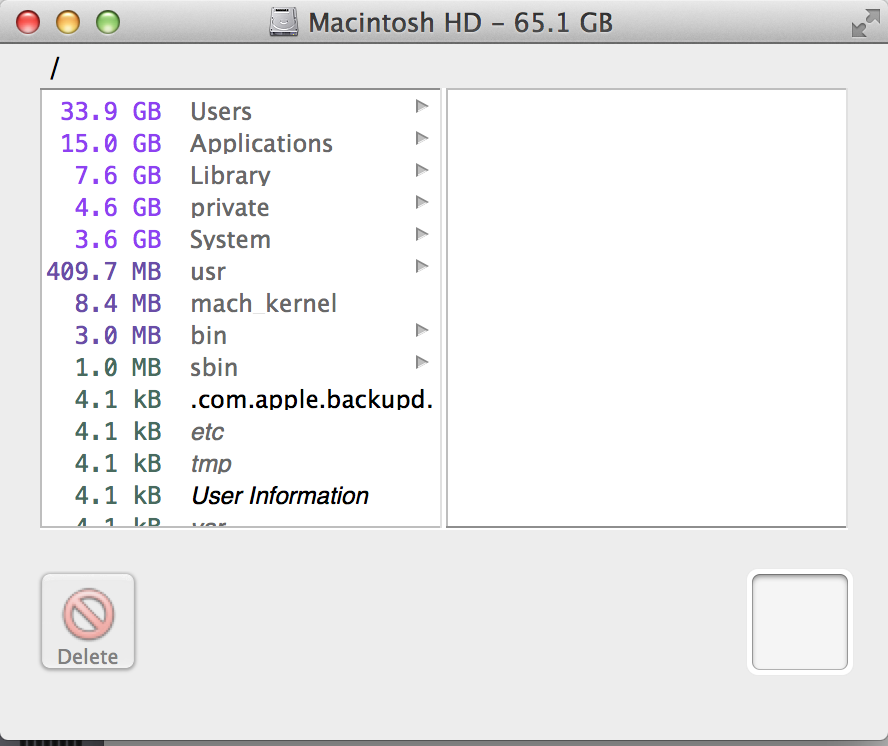
In fact, I looked into it using a disk sweeping application, and it profiled my hard drive as only having 65.1GB in total! Where are the other ~200GB? What's filling them?

(I did search using Finder for files over 1GB, and there were only a few, so I don't think the problem is one massive file).

Result of ImageDiskSweeper: Result of ImageDiskSweeper

3

7 Answers 7

3

It turns out that another user account (not the one I was logged into) had many gigabytes of photos stored on the hard drive. DiskImageSweeper, along with any other tools (spotlight search, etc.) could not search through the other user's files, so they were virtually undetectable.

I solved the problem by logging into the other user account and clearing up space. I imagine that you could also just delete the user's account and have the same effect.

1
  • Or run OmniDiskSweeper from an admin account - this is one major case it is called an Administrator account as for disk space you need to have more power than a simple user
    – mmmmmm
    Commented Apr 8, 2016 at 19:39
1

I had a similar issue with a customer's MacBook Pro about a year ago. The disk was saying it was practically full, yet there was hardly anything on it. A few steps to take you through here.

  1. Click the Apple () Menu on your Menu Bar
  2. Click "About This Mac"
  3. Click the "Storage" tab
  4. You should see a breakdown of your hard drive as in the screenshot below
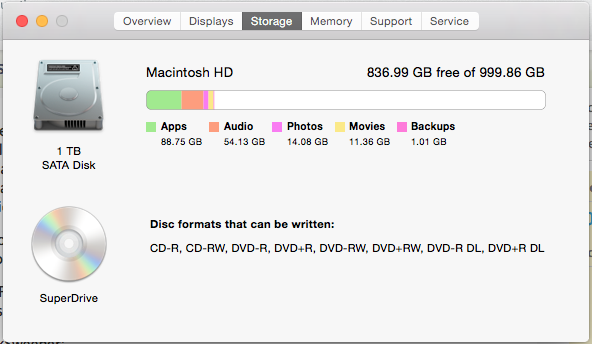
Storage Space

The case I saw last year had an enormous amount of data reflecting under "Backups", but none of that information could be found anywhere, and disk scanners couldn't find it. Here's what I did:

  1. Open Terminal
  2. Run defaults write com.apple.finder AppleShowAllFiles -bool TRUE && killall Finder
  3. Open Finder and navigate to the root of your drive ("/")
  4. Press Cmd+alt+i to bring up the Inspector (I prefer this over Cmd+i for this step as it allows you to change the contents of the Inspector window depending on what you have selected)
  5. With nothing selected, Inspector should show you that you have 245GB used.

Now comes the tedious part.

Since you say you've already checked your User folder and Applications, don't worry about them, but otherwise check each of the hidden folders to verify their file size. In the case I had, ".Trashes" was actually the culprit. There were two ".Trashes" folders and one was heavily bloated. Check to see if you have multiple ones. If you do, check their sizes, one of them is most likely the culprit. The other folder to check would be "/var" as this is where caches are stored from Mavericks onwards.

Keep checking through folders until you find the largest one, then drill down from there and trash it (so long as you know it is actually a safe folder to trash!).

In the event that you don't have permission to trash the folder, switch back to Terminal and run:

sudo rm -rf /path/to/folder

replacing "/path/to/folder" with the actual folder path.

To re-hide hidden files once you're done, simply run

defaults write com.apple.finder AppleShowAllFiles -bool FALSE

in Terminal.

Hope all that helps. :)
1

I had a similar issue with a client's laptop trying to install NI Kontakt Ultimate 10 (~ 330 GB) on a SSD with 400 GB "free" space.

Probably TimeMachine local snapshots is enabled on your Mac. Local snapshots are basically backup files stored on your local hard-disk (as opposed to regular ones stored on the external TimeMachine volume). This is a useful feature for people who travel a lot, so they can revert files to recent versions even when they are not connected to their home TimeMachine.

To disable "local snapshots" open Terminal and enter sudo tmutil disablelocal and hit .
Enter your admin password at the prompt (the password will not be visible) and hit again.
Enter exit, hit and quit Terminal.

It may take a while to free up the space.

Now check in Finder and Disk Utility if you regained valuable disk space.

To reenable local snapshots just enter sudo tmutil enablelocal.

1

You could make a backup using time machine to an external harddrive.

When that is completed shut down your mac and reboot it with the alt-key pressed.

You will get in a menu where you can choose which drive you want to startup from. When you have os x 10.10 installed you will see the drives "Macintosh HD" amd os x 10.10 recovery.

Start you mac from the recovery drive and go to disk utility.

You can erase you disk (Macintosh HD). keep in mind that OS X needs to be installed again than. You can reinstall OS X from the menu where you can choose disk utility. To reinstall os x, an internet connection is required.

When you did this, you can start up your mac like you normally do and go to time machine. Do not restore the whole backup! Select some files to restore and check if your problem with the disk space still occures. Repeat this step until all document are restored on you disk.

Sometimes a bug in the software can create this, or orther, problems and is most of the times solved by a clean install.

1
  • If I were to try to solve this myself, this is what I'd do, but I think I'm just going to bring the laptop to a Genius bar so they can carry this out. Commented Dec 17, 2014 at 18:51
1

I found that the problem was Microsoft Office (big surprise). It had library files that were almost 87 GB, and for what?

I had to uninstall the programs, go into the Library files and delete them. The way to completely uninstall MS Office for Mac is here: https://support.office.com/en-us/article/Uninstall-Office-2016-for-Mac-eefa1199-5b58-43af-8a3d-b73dc1a8cae3

Also try to clear out the .trashes folder:

https://superuser.com/questions/728709/how-to-delete-trashes-on-ntfs-drive-on-mac

1
  • Thanks for the contribution towards answering this question. However, please summarize data found in links and quote them here as the link could die and nobody could learn from your answer.
    – John K
    Commented Oct 2, 2015 at 20:00
0

I had the same problem. I think, disk sweeping application is best. I cleared my space manually by looking into disk sweeping data and freed 60 GB of space. Mac saves everything on hard drive even your emails. Dropbox, Camera Roll and emails files are also synced with hard drive. Even if you are using XCode or Android, there are GB's of backup and useless data stored on hard drive. Just go through "Users" and "Library" folder manually and check what you need and what you do not need. Unsync Google and Dropbox from external hard drive. Check these blogs for help.

  1. http://blog.neverthesamecolor.net/how-to-recover-disk-space-from-xcode/
  2. https://www.dropbox.com/guide/business/manage-files/save-your-hard-drive-space

Hope, it will help you.

-2

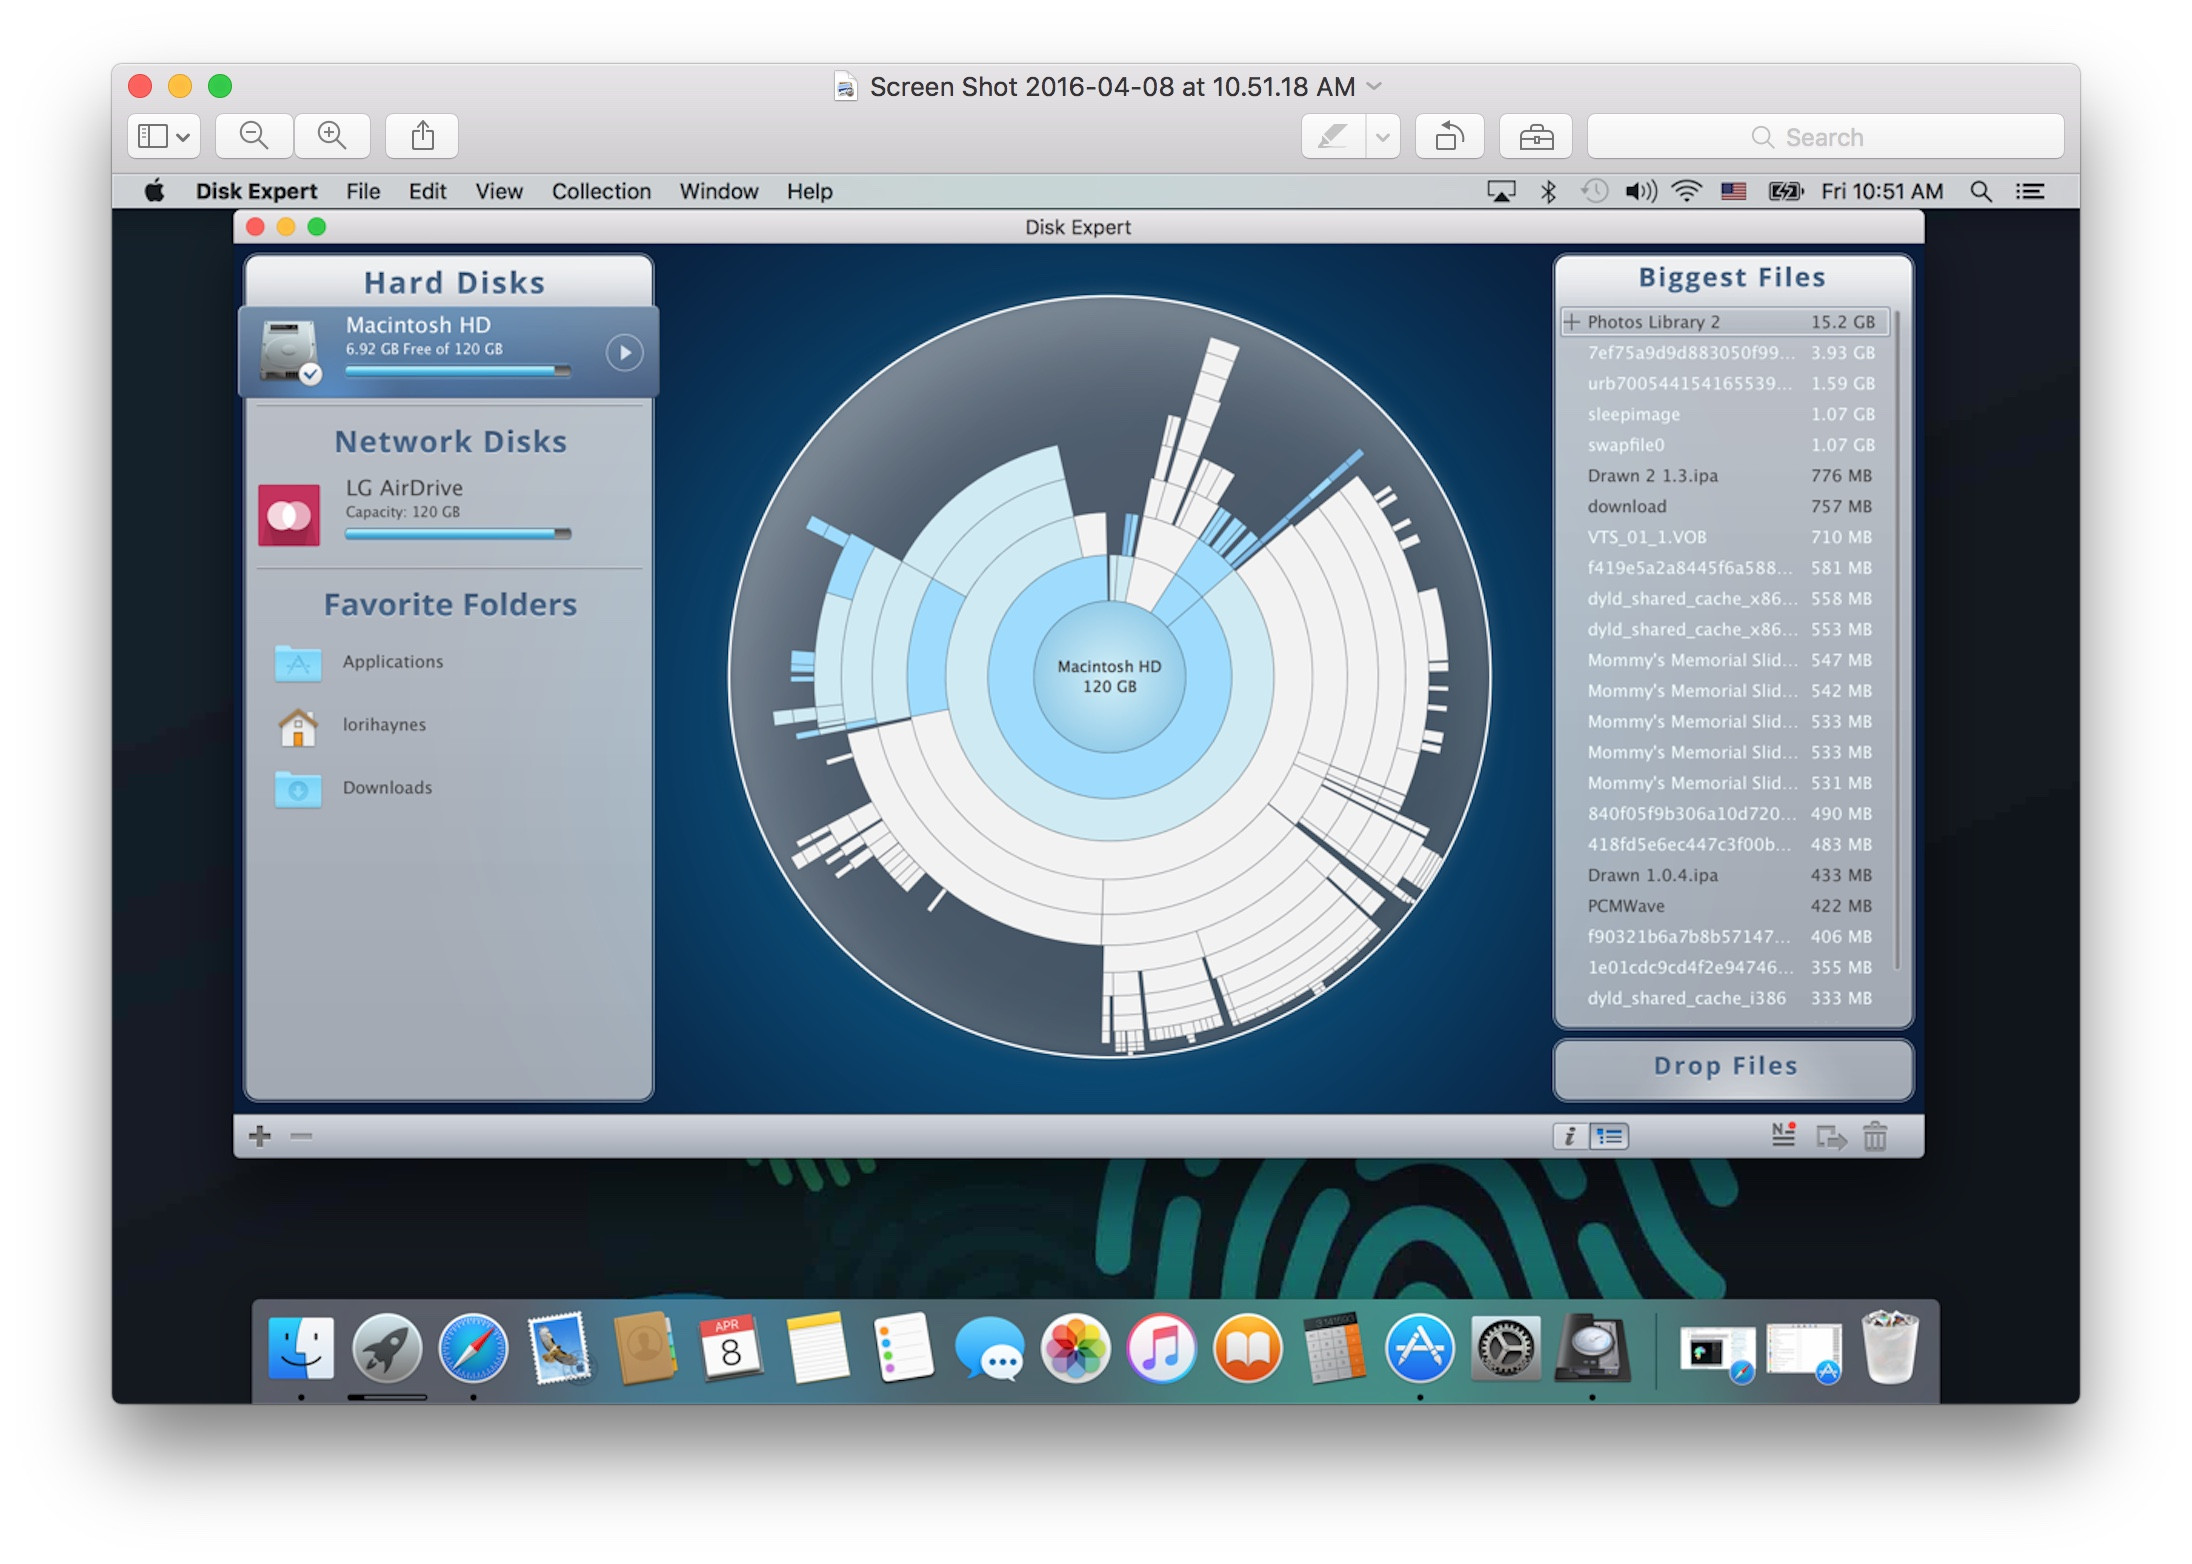
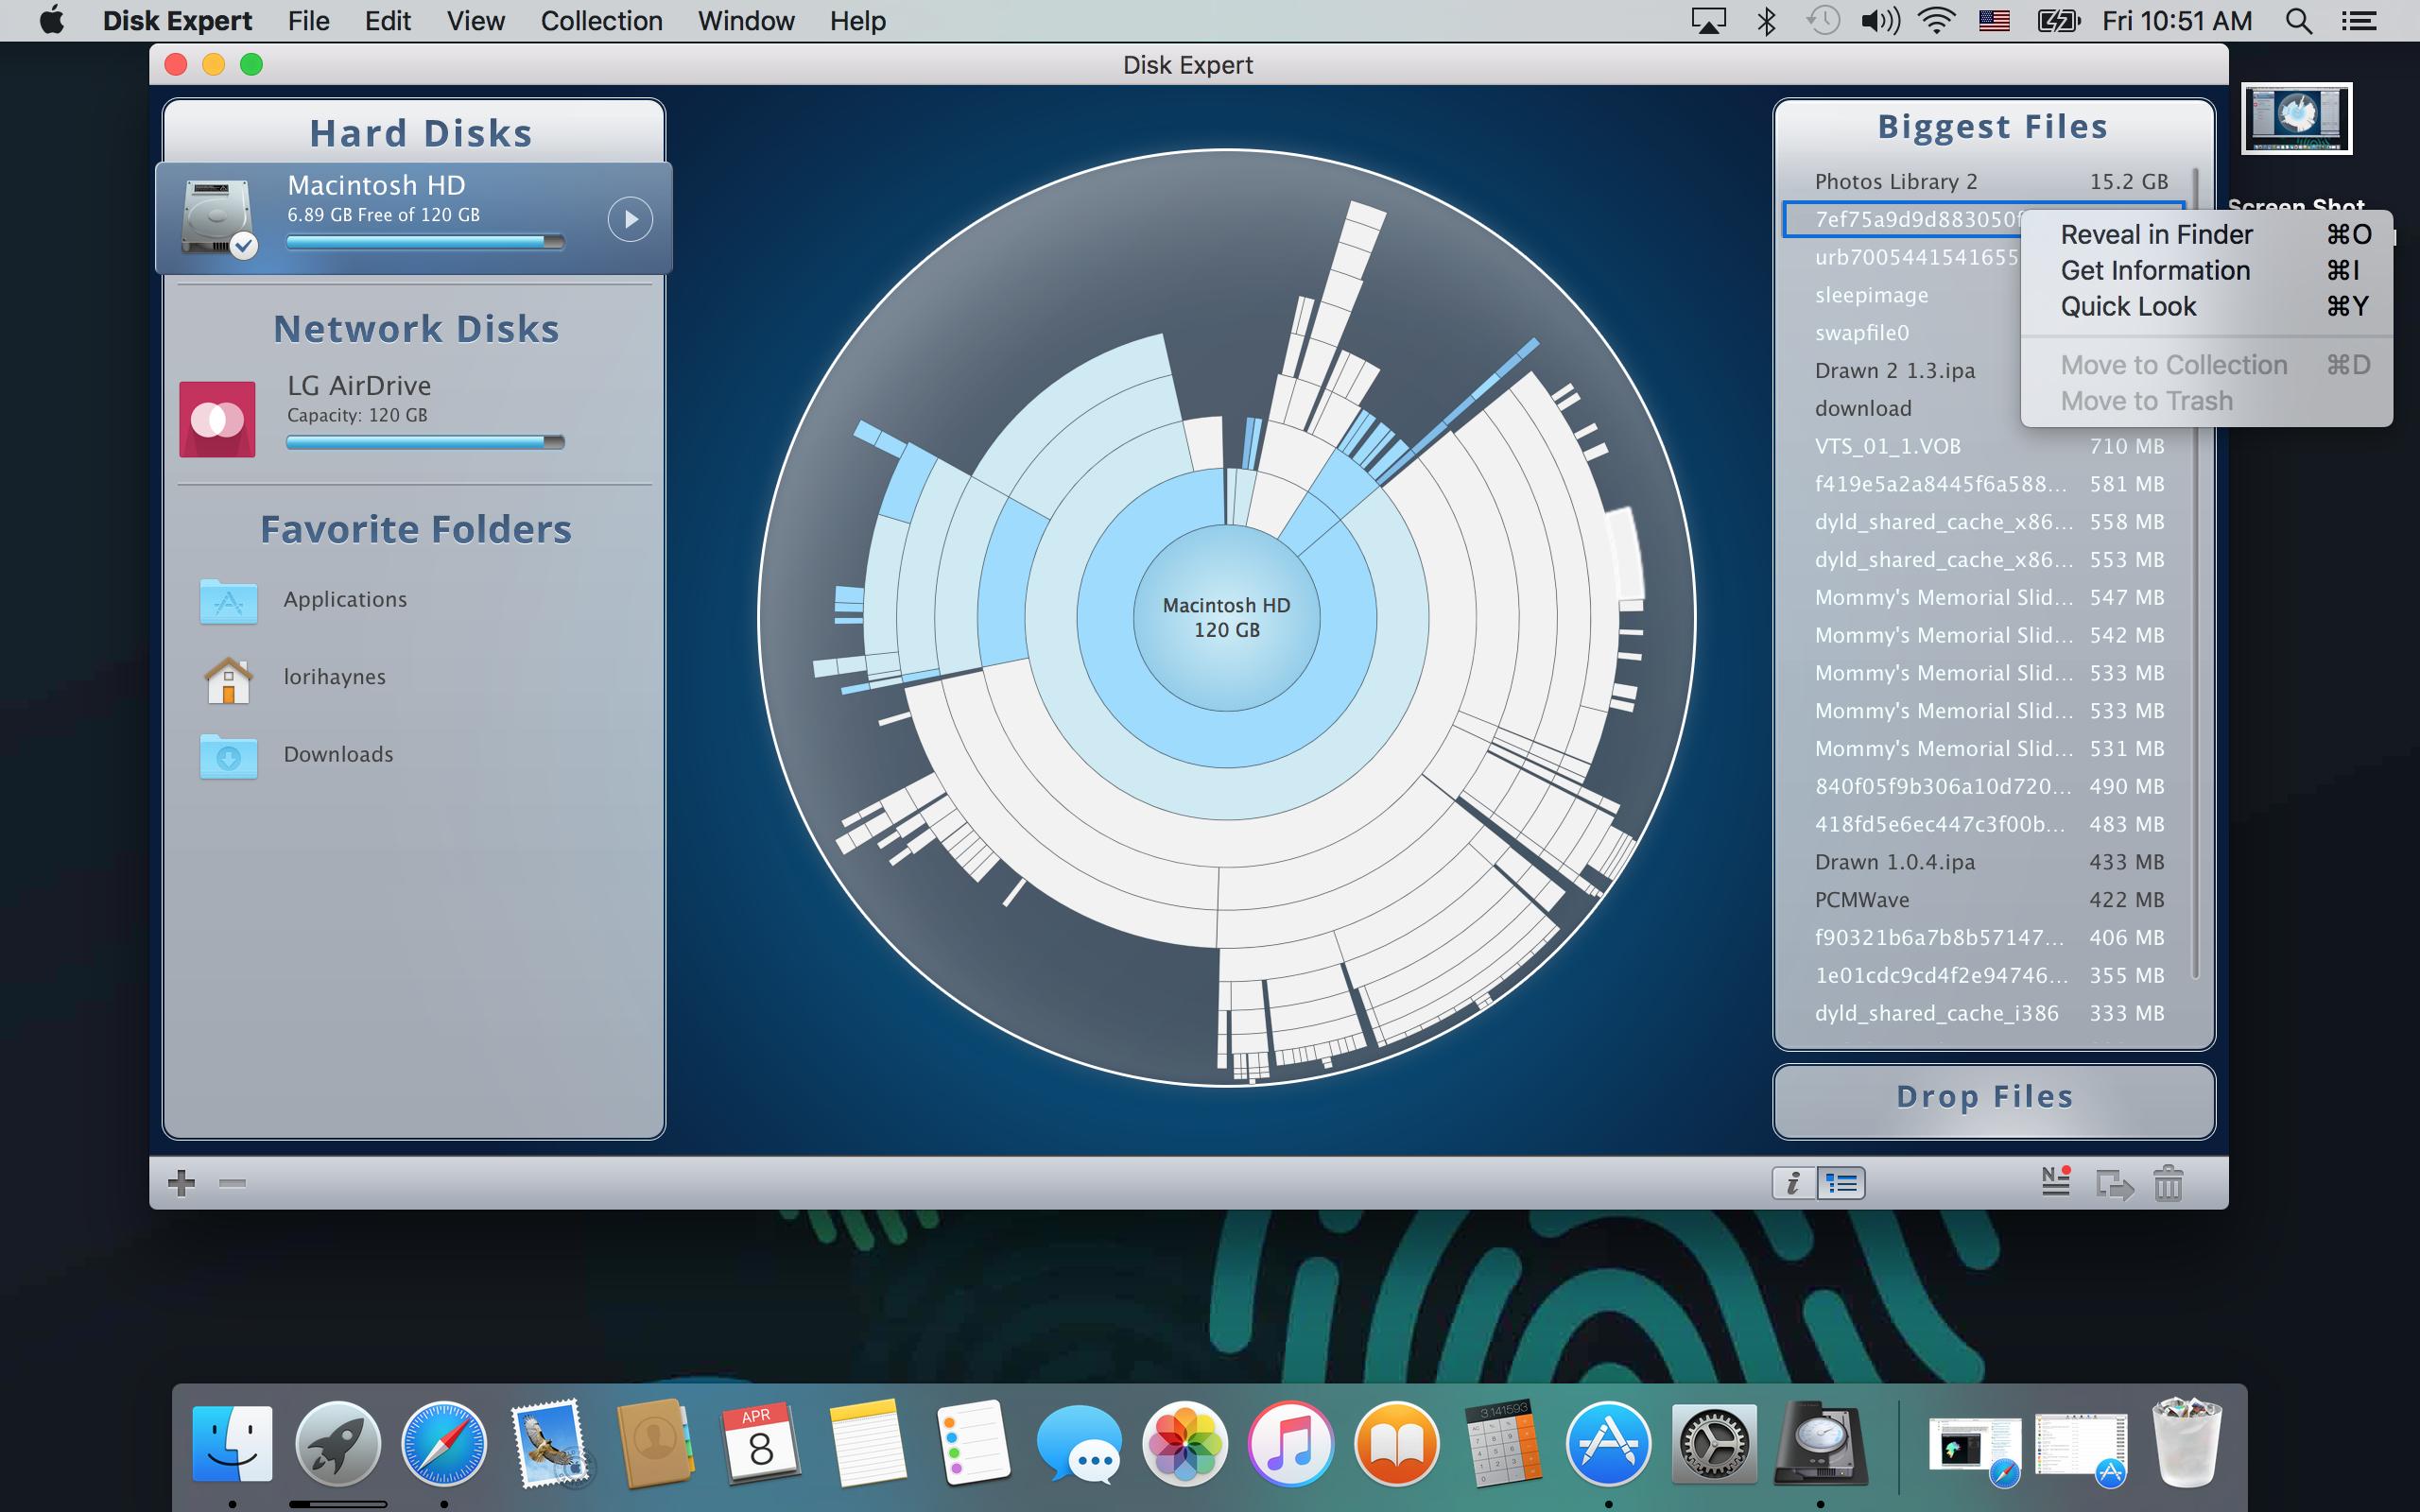
My startup disc was full with over 90G of the dreaded "other"!I read some of the answers and thought I'd give you a more current answer to how to free up space. From the Apple App Store, I downloaded an free, Apple-approved app called "Disc Expert". (I haven't checked but they may have one for Windows, too.)

Darn it! I thought it would show my screen shot! But if you copy & paste the address in your search bar, you'll see what I wanted to show you here.

enter image description here

enter image description here

It will show the top 25 largest files, (and in my case, also hundreds of other files that I didn't know existed!) Anyway, you can right-click on any file--it gives you an option to open it in Finder so you can see what it is. Then you can drag and drop any unwanted files into the trash! (I used an external hard drive to save important things.) I also dragged a lot of files into my iCloud account (which you can see on your Finder window on the left-hand side. External Hard drives are MUCH more reasonable, cost-wise, than they used to be. I just bought a Seagate Backup Plus Slim 1TB for $59.00 on Amazon, but check different electronic stores to compare prices. It also comes with 200GB of free OneDrive cloud storage for 2 years is included when you register a new Backup Plus drive online! After registering your drive on Seagate.com, a link will be provided to add 200GB to any new or existing OneDrive account. Sorry so long! I'm not an expert--but I am a fast learner and researcher, so I tried to write this in layman's terms. I hope it helps! Good Luck!:-)

1
  • Oops--I forgot to tell you that I have a Macbook Pro (early 2015) with IOS El Capitan. Commented Apr 8, 2016 at 19:37

You must log in to answer this question.

Not the answer you're looking for? Browse other questions tagged .