15

I have dozens of folders that I need to compress into individual zip files.

If I select all of these folders in the Finder and do "Compress [X] Items," I get one zip file containing all of the folders, whereas what I want is one zip file per folder.

I tried creating a workflow with Automator using the "Create Archive" action, but it behaves the same way: inputting multiple files/folders outputs a single zip file. There's no way to specify that the action run on each item individually.

Basically, I'm looking for a way to avoid having to tediously run "Compress" in the Finder on every single folder one at a time. Is there any way to automate this?

2
  • 1
    I updated my answer to improve the code used to increment the zip archive filename so it emulates how the Finder context-menu Compress [n] Items command increments a filename. Commented Jan 28, 2016 at 16:34
  • Sorry, I updated the code once again to remove the unnecessary popd and corrected a fatal typo in for i in $bn*.zip; do, which should have been for i in $bn *.zip; do. Note the space between $bn and *.zip, it was missing and shouldn't have been. So please update it in your implementation otherwise it steps on File Name 2.zip when the basename has a space in it. Commented Jan 28, 2016 at 23:16

2 Answers 2

18

Here is an Automator Service1 that becomes available in Finder when Folders are selected and emulates the context-menus Compress [n] Items command except it creates an individual zip archive file for each selected Folder in the name of the selected Folder. If the Folder Name.zip file already exists then a " 2" (space 2) is appended to the filename, e.g. Folder Name 2.zip. This ensures an existing zip archive file is not touched and the zip archive filename will be automatically incremented as necessary.

1 In macOS Mojave, and later, an Automator Service is called a Quick Action. There are also other minor nomenclature differences but they should be more obvious when comparing them to pre-macOS Mojave Automator workflows.

To Create the Service:1

  1. Open Automator and select Service1 or File > New > Service If Automator is already open.

  2. Set Service receives selected to folders and in to Finder.

  3. Add a Run Shell Script Action, setting Shell: to /bin/bash and Pass input: to as arguments and add the following code:

    for f in "$@"; do
    
        dn="$(dirname "$f")"
        bn="$(basename "$f")"
    
        cd "$dn" || exit
    
        if [[ ! -e "$bn.zip" ]]; then
            ditto -c -k --sequesterRsrc --keepParent "$f" "$bn.zip"
        else
            n=2
            for i in $bn *.zip; do
                if [[ "$bn $n.zip" == "$i" ]]; then
                    n="$(( n + 1 ))"
                fi
            done
            ditto -c -k --sequesterRsrc --keepParent "$f" "$bn $n.zip"
        fi
    
    done
    
    afplay /System/Library/Sounds/Purr.aiff
    
  4. Save the Service as: Compress Folders Separately

To Use the Service:

In Finder or on the Desktop select multiple Folders, then right-click and select Compress Folders Separately from under Services.

Or after selecting the target Folders, you can also click Finder > Services > Compress Folders Separately from the menu bar.

There you have it, a way to compress multiple folder separately and simultaneously at one time in individual zip archives while emulating how Finder creates a zip archive file. Meaning the zip archive contains preserved resource forks and HFS meta-data in the subdirectory __MACOSX and embeds only the parent directory name source in destination-archive, not the fully qualified pathname as when using zip (without -j) to create the archive.

Image of Compress Folders Separately
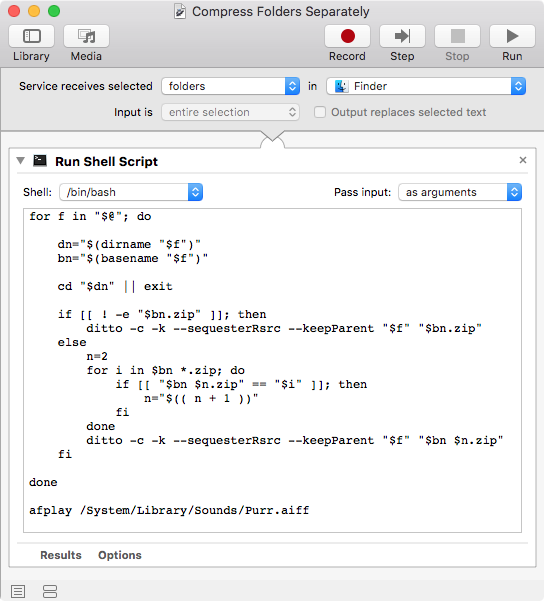
Compress Folders Separately - Automator Service

1
  • I checked both your solution and @ababak's. They give exactly the same result and ababak's is far easier to implement. I up voted both anyway.
    – turzifer
    Commented Jul 19, 2016 at 8:11
27

There's an alternative solution that's built-in if you don't want to use Automator and are fine with changing Archive Utility's settings.

  1. Open the Archive Utility.app located in /System/Library/CoreServices/Applications/
  2. Go to File > Preferences
  3. Change the "Use Archive Format" preference to "Zip archive"
  4. Drag and drop the folders into its icon in the dock.
6
  • the nice thing about this option is you can set the Archive Utility.app preferences to move the original to trash after it finishes, it's not limited to folders. Is there a way to set up an Automator service to open with Archive Utility.app as a service if you want right-click as an option? I ran into a limitation as Archive Utility.app can't be selected using the Launch Application action.
    – thepen
    Commented Aug 2, 2016 at 5:31
  • 1
    @thepen, of course you can select Archive Utility as the Launch Application Action. You just need to select "Other…" and navigate to its location which is /System/Library/CoreServices/Applications/ (you can press Cmd-Shift-G when the file select dialog is open to paste this path for quick navigation)
    – ababak
    Commented Aug 3, 2016 at 8:16
  • 1
    what's the difference between 'archive format' and 'zip archive'?
    – user1995
    Commented Jan 20, 2020 at 22:02
  • This method is a much easier work flow. I tried the command: for item in *; do zip "${item}.zip" "${item}"; done in the terminal but it didn't work right. Unknown as to why but I didn't want to take the time to figure it out. This worked just fine.
    – ArchonOSX
    Commented Feb 1, 2020 at 12:08
  • I've used this successfully to zip up EPUB packages before putting them in a Calibre library. The automator method, while excellent, doesn't see them as folders, but still as packages. Commented Sep 1, 2022 at 21:45

You must log in to answer this question.

Not the answer you're looking for? Browse other questions tagged .