22

My MBA 2012 with OS X 10.9.4 Mavericks won't boot anymore - it simply freezes after the initial jingle. I already tried resetting NVRAM and SMC, but to no avail. I don't have any time machine backups.

However, I still have a disc image of Mavericks sitting on an external hard drive, a USB stick and access to a notebook with Windows 7.

I haven't yet found any tutorial on how to create a bootable USB drive on Windows in order to reinstall OS X on my beloved Macbook Air.

Any help would be greatly appreciated!

7
  • possible duplicate of How can i initiate os x installaion from a dmg in windows on a Mac?
    – killswitch
    Commented Aug 16, 2014 at 4:54
  • 2
    Thanks for your response. However, the problem differs from the one you linked to since I do not want to run an OS X installation in Windows (running in bootcamp) on a Mac.
    – kinari
    Commented Aug 16, 2014 at 8:05
  • 3
    What I want to do to is easily achievable using createinstallmedia or Disk Utility. (see macworld.com/article/2056561/…) But since I do not have access to another mac, I am looking for a way to get this done in Windows.
    – kinari
    Commented Aug 16, 2014 at 8:22
  • The question asked is about how to create a bootable Mac installing USB in the windows embitterment. Basically your question seems to ask the same thing.
    – killswitch
    Commented Aug 16, 2014 at 8:25
  • 4
    Yes, more or less. However, the answer provided isn't helpful in my case I'm afraid. Neither do I have a recovery partition available, nor another osx. In fact, that is exactly the problem at hand. I tried using PowerISO, but my Mac doesn't recognize the USB stick afterwards unfortunately.
    – kinari
    Commented Aug 16, 2014 at 9:00

11 Answers 11

14

According to the first answer here, https://superuser.com/questions/383235/create-a-bootable-usb-drive-from-a-dmg-file-on-windows, there's a tool with a free trial called TransMac that can do it. Just make sure the USB drive is formatted with GPT and not MBR.

What might be easier, however, is that that model has support for Internet Recovery. If you boot holding Command-R and you have a WiFi connection, it can actually boot into recovery mode without a recovery partition on a drive (or even without a working drive).

Having said that, your description of a crash right after the boot chime could signify a more serious hardware problem and you may not be able to boot anything. If you boot holding the option key down, the startup disk selection screen should appear. If it crashes anyways, you may be looking at a hardware problem.

3

I know this question is old but it is still valid. I was never able to write a Mac installer image to my Flash Drive and have it bootable, unless I did it on a Mac. Using Michael D. M. Dryden's Link, I was able to use the Diskpart command to clean and prep a GPT partition on a flash drive for an OSX Mavericks install image.

I used TransMac on Windows 7 to restore the image file I had to the Flash Drive, it created a bootable Mac image on my flash drive. Someone had reported that the method for using DISKPART did not work, but I have done this twice and it works remarkably well, and it's the only method I could find to create a Mac-Bootable Flash. I've been trying to post this to confirm that it works for some time, I just hope it helps someone else, because it is a very easy solution.

Here are the Diskpart commands used to prep the Flash Drive, just to have them here in case my Link does not work:

diskpart
DISKPART> list disk

(Find the disk number)

DISKPART> select disk x (from result of List Disk)

Disk x is now the selected disk.

DISKPART> clean

DiskPart succeeded in cleaning the disk.

DISKPART> convert gpt

DiskPart successfully converted the selected disk to GPT format.

DISKPART> create partition primary

Note: I use "Rufus" for all other USB writing and formatting for Windows systems, it's a great app, but I had previously tried to format the drive as GPT using that, as a Fat32 partition. When I tried to inject the image, Transmac told me that the drive was "write protected". So basically, the USB drive cannot have any high level formatting, the Windows system should detect the drive as "not formatted" for this to work, which it will if prepped right with Diskpart.

2
  • Rufus won't make a bootable USB compatible with Mac as it cannot interpret the boot loader (at least not in Mavericks and up). Fat32 can't handle the 5+GB Mavericks image either. Not say you didn't get an older version to work, however, just to keep others from wasting their time.
    – MC9000
    Commented Jan 5, 2018 at 20:36
  • I cannot believe that TransMac fails to write to the disk, even if it's formatted by itself! Using diskpart to clean and make the GPT partition scheme worked wonderfully. What a piece of flimsy software this TransMac is. Commented Mar 7, 2023 at 20:54
2

Note: Links to instructions for other versions of OS X/macOS can found here.

You can make a bootable USB flash drive OS X Mavericks installer from your Windows installation.

Since Apple does not offer a public URL for downloading Mac OS X Mavericks, this answer instead requires the InstallESD.dmg Mac disk image file which can be found in the Contents/SharedSupport folder of the "Install OS X Mavericks" application.

Note the following:

  • Since El Capitan has the same system requirements as Mavericks, you may instead wish to install El Capitan.

  • When testing using a clean install of 64 bit Windows 7 SP1, Paragon Partition Manager Community Edition 64bit would not install unless the "Convenience rollup update for x64 Windows 7 SP1" was first installed. This required downloading and installing hotfix KB3020369, followed by hotfix KB3125574. Both hoxfixes can be downloaded from the Microsoft Update Catalog.

  • This answer was also tested using a clean install of 64 bit Windows 10 (version 21H2).

  • I tested this answer using the latest "Install OS X Mavericks" application available from the Apple App Store. This requires OS X Mavericks to appear as purchased after logging in at the Apple App Store. (I purchased Mavericks years ago when it was first released.) Beware, if you try this, you probably will have to access the Apple App Store from an older version of OS X. I used the OS X Lion operating system installed in a VMware Fusion Player virtual machine on a 2013 iMac, where the host operating system was macOS Catalina (10.15.7). The InstallESD.dmg Mac disk image file was then transferred to the Windows machine.

Below are the steps for making a bootable USB flash drive OS X Mavericks installer.

  1. Use Microsoft Edge (or some other web browser) to download the following installers to your Downloads folder. The file names are current as of October 2, 2022. If both 32 bit and 64 bit versions are available, the 64 bit version is given in the table.

    Product Use Installer Type
    7-Zip Free 7z2201-x64.exe Application
    GPT fdisk Free gdisk-windows-1.0.9.zip Compressed (zipped) Folder
    dd for Windows Free ddrelease64.exe Application
    TransMac 15 day free trial tmsetup.zip Compressed (zipped) Folder
    Paragon Partition Manager Community Edition 64bit Free for personal and home use Paragon-1081-FRU_WinInstallDemo_x64_17.9.1_000.exe Application
  2. Install all downloads except “dd for Windows” and “GPT fdisk”. If you wish, the installed downloads can be uninstalled from the Windows Control Panel after use. Copy the command sgdisk64.exe from the downloaded GPT fdisk zip file to your Downloads folder.

  3. Copy the InstallESD.dmg Mac disk image file to your Downloads folder. This file can be found in the Contents/SharedSupport folder of the "Install OS X Mavericks" application. If the volume containing this file is HFS+ formatted, then use TransMac to copy the file, otherwise use Windows Explorer. If you need to use TransMac, then open the TransMac application with Administrator privileges. (In other words, right click on the TransMac icon, then choose "Run as administrator" or "More" > "Run as administrator".)

  4. Use a 7-Zip File Manager application window to extract the Packages folder, 3.hfs file and the InstallAssistant.icns file from the InstallESD.dmg Mac disk image file to your Downloads folder. From a Windows Explorer window, start by navigating to your Downloads folder. In this window, right click on the InstallESD.dmg file, then select "7-Zip" > "Open archive" > "#". This should open a 7-Zip File Manager application window. In this window, right click on each file or folder in the order given in the table below, then select the corresponding action.

    File or Folder Action Type Comment
    1.pkg Open Inside * Package File
    InstallMacOSX.pkg Open Folder
    InstallESD.dmg Open Mac Disk Image File
    OS X Install ESD Open Folder
    Packages Copy To… Folder See footnote †
    BaseSystem.dmg Open Inside * Mac Disk Image File
    3.hfs Copy To… HFS+ volume image See footnote †
    3.hfs Open HFS+ volume image
    OS X Base System Open Folder
    Install OS X Mavericks.app Open Folder
    Contents Open Folder
    Resources Open Folder
    InstallAssistant.icns Copy To… Apple Icon Image File See footnote †

    Copy to your Downloads folder.

    When finished, close the 7-Zip File Manager application window.

  5. Insert a 8 GB or larger flash drive into an USB port. If prompted, you do not need to initialize the flash drive.

  6. Internally, the BaseSystem.dmg Mac disk image file contains a drive that is using the Apple Partition Map (APM), which is not well supported in a Windows environment. This step creates a GUID Partition Map on the USB flash drive instead of copying the APM from the BaseSystem.dmg file. Once the partition is created on the USB flash drive, the HFS volume image stored in the 3.hfs is copied to this partition.

    Note: See below for an alternative to this step, which does not require using GPT fdisk.

    Open an "Administrator: Windows PowerShell" window. (In other words, right click on the "Windows PowerShell" icon, then choose "Run as administrator" or "More" > "Run as administrator".) In the "Administrator: Windows PowerShell" window, take the following actions.

    • Change the current directory to be the location of your Downloads folder. If your Downloads folder is in the default location, then you can use the command given below. Otherwise, make the appropriate substitution.
      cd -d $env:userprofile\downloads
      

      Note: If necessary, the File Explorer can be used to determined the location of your Downloads folder. From the File Explorer, right click on your Downloads folder, then select Properties. When the popup titled "Downloads Properties" appears, select either the General or Location tab to view the location.

    • Enter the following to get a list of drives. Note, diskpart is an interactive command.
      diskpart
      list disk
      
    • From the values in the Disk ### and Size columns, determine the number assigned to the USB flash drive. Here the number is assumed to be 1. The following creates an empty Master Boot Record (MBR) table the USB flash drive, then exits the diskpart command. If your number is different, then make the appropriate substitution. Note, the clean command should be entered twice, as shown below.
      select disk 1
      clean
      clean
      exit
      
    • The following sets the dn variable to 1. If the number assigned to your USB flash drive is different, then make the appropriate substitution.
      $dn=1
      
    • The following commands creates a HFS type partition, which is the same size as the 3.hfs file. The ddrelease64 command zeros the first 5120 bytes of the partition. Note, the sgdisk64 command will automatically convert the drive to use the GUID Partition Table (GPT) partition style.
      .\ddrelease64 if=/dev/zero count=10 seek=40 of=\\?\Device\Harddisk$dn\Partition0
      $ns=(get-item 3.hfs).length/512
      .\sgdisk64 -a 8 -n 1:40:+$ns -t 1:af00 -i 1 "${dn}:"
      
    • The following command copies the HFS volume image in the 3.hfs file to the HFS partition on the USB flash drive.
      .\ddrelease64 if=3.hfs bs=1M of=\\?\Device\Harddisk$dn\Partition1 --progress
      
    • Close the "Administrator: Command Prompt" window.
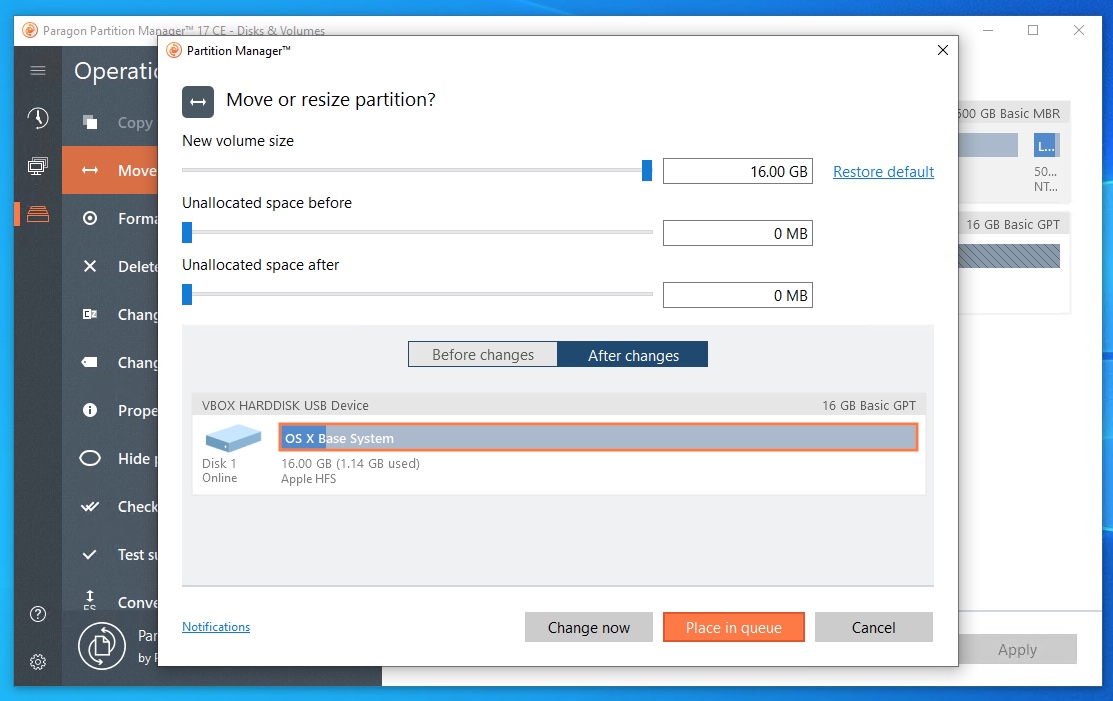
  7. Open the Paragon Partition Manager 17 CE application. Select to resize the partition with the Apple HFS volume on the USB flash drive to maximum size, as shown below. Next, select the "Change now" button. When finished, select the "Close" button.

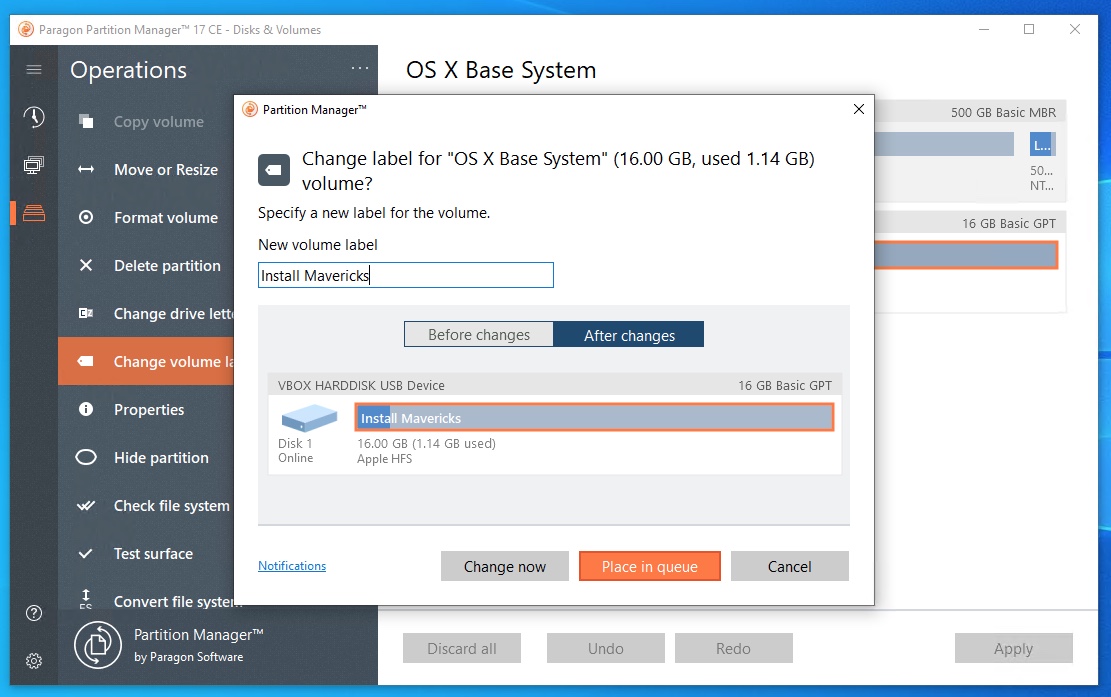
    Next, select to change the volume label on this Apple HFS volume from "OS X Base System" to "Install Mavericks", as shown below. Next, select the "Change now" button. When finished, select the "Close" button.

    When finished, close the Paragon Partition Manager 17 CE application window.

  8. If not already open, then open the TransMac application with Administrator privileges. (In other words, right click on the TransMac icon, then choose "Run as administrator" or "More" > "Run as administrator".) In the TranMac application window, take the following actions.

    • If TransMac was already open, then select "Tools" > "Refresh Drive List" from the pulldown menu.

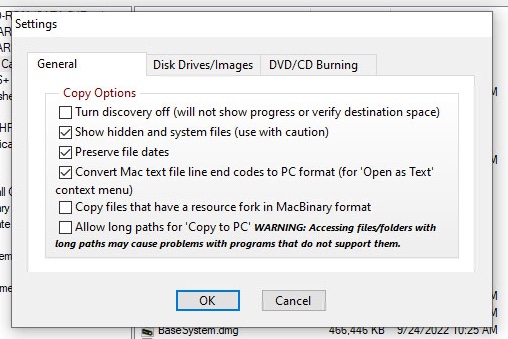
    • Select "Tools" > "Settings" from the pulldown menu. In the "General" tab of the "Settings" popup, select the same copy options as shown below.

      TransMac General Settings

      Select OK when finished.

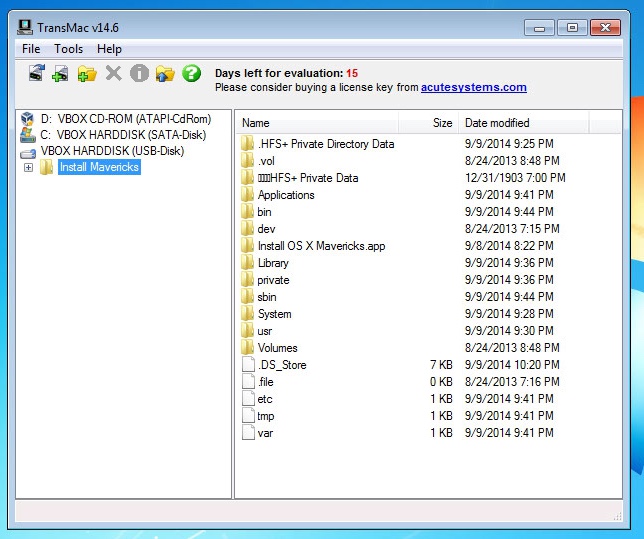
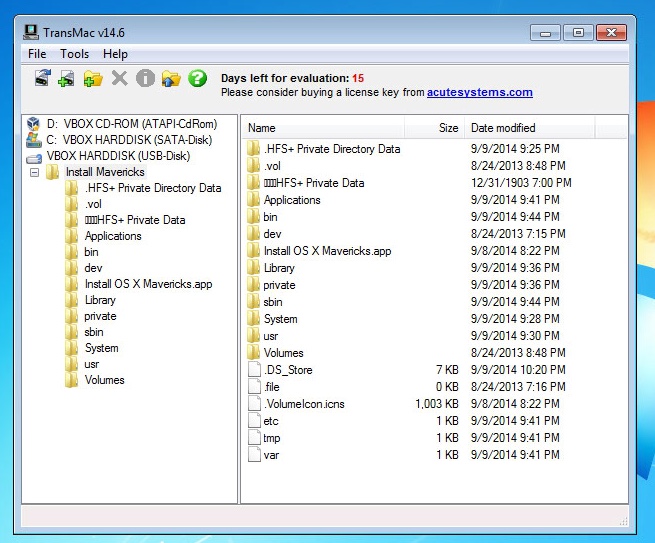
    • Navigate to root folder on the USB flash drive volume labeled Install Mavericks, as shown below.

      root folder

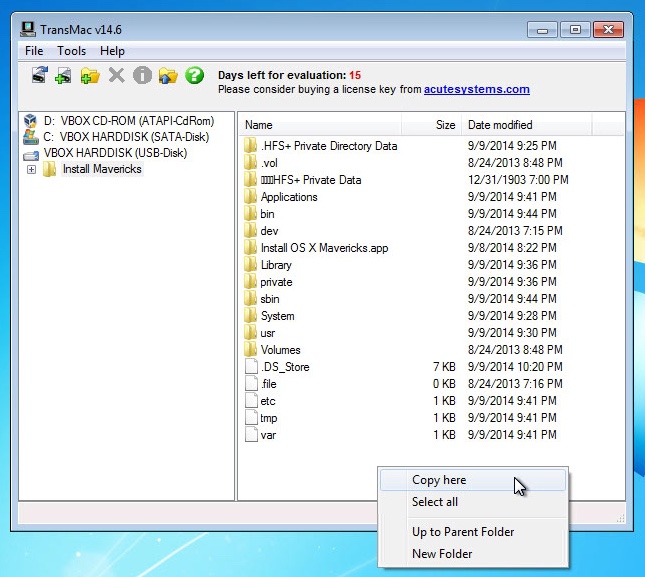
    • In the listview pane, right click, then select "Copy Here", as shown below.

      root Copy Here

      Select to copy the InstallAssistant.icns file in your Downloads folder.

    • In the listview pane, right click on the InstallAssistant.icns file, then select "Rename". Change the name to .VolumeIcon.icns. When finished, the treeview and listview panes should appear as shown below.

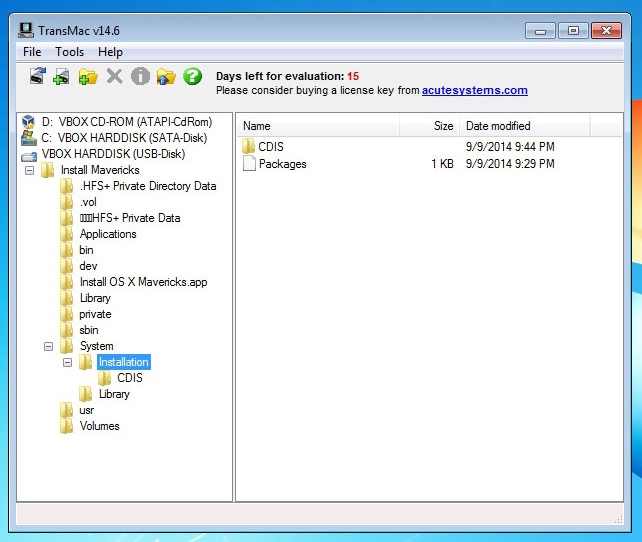
    • Navigate to System/Installation folder on the USB flash drive volume labeled Install Mavericks, as shown below.

      System/Installation folder

    • In the listview pane, right click on the Packages file, then select "Delete". When prompted, select the Yes button in the popup to confirm.

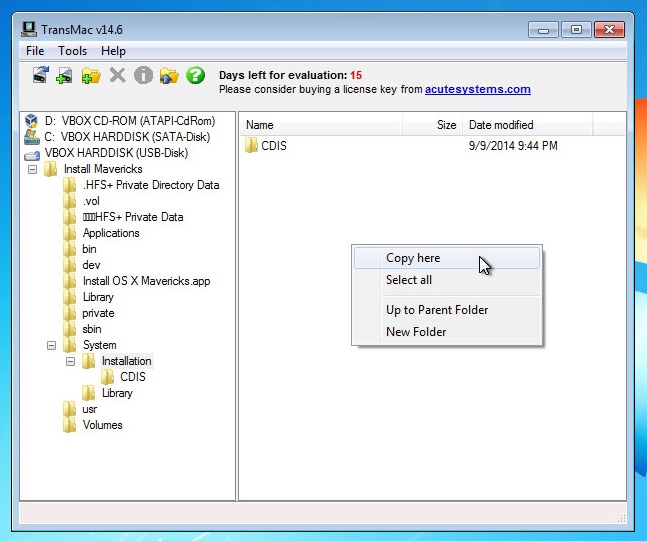
    • In the listview pane, right click, then select "Copy Here", as shown below.

      System/Installation Copy Here

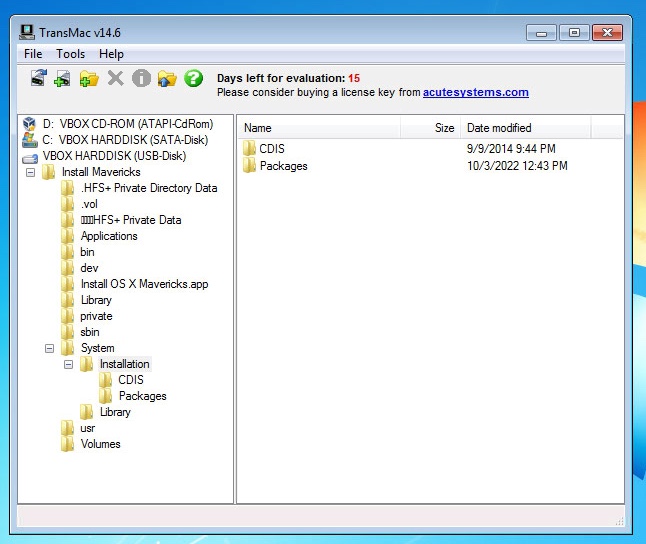
      Select to copy the Packages folder in your Downloads folder. (This may take a while to complete.) When finished, the treeview and listview panes should appear as shown below.

    • Close the TransMac window.

  9. Use the Windows Explorer to delete the Packages folder, 3.hfs file and InstallAssistant.icns file in your Downloads folder. If you wish, you can also delete the downloaded files. When finished, close the Windows Explorer window, then empty the Recycle Bin.

Alternate Step 6

This alternate step uses a version of PowerShell that is probably not compatible with Windows 7. The step was tested using Windows 10 (version 21H2), which included PowerShell version 5.1.19041.1682. If you are using a version of Windows newer than Windows 7 SP1 and your version of PowerShell is compatible with this alternate step, then you can use this step.

Start by opening an "Administrator: Windows PowerShell" window. (In other words, right click on the "Windows PowerShell" icon, then choose "Run as administrator" or "More" > "Run as administrator".) In the "Administrator: Windows PowerShell" window, take the following actions.

  • Change the current directory to be the location of your Downloads folder. If your Downloads folder is in the default location, then you can use the command given below. Otherwise, make the appropriate substitution.

    cd -d $env:userprofile\downloads
    

    Note: If necessary, the File Explorer can be used to determined the location of your Downloads folder. From the File Explorer, right click on your Downloads folder, then select Properties. When the popup titled "Downloads Properties" appears, select either the General or Location tab to view the location.

  • Enter the following to get a list of drives.

    get-disk
    
  • From the values in the Number and Total Size columns, determine the number assigned to the USB flash drive. Here the number is assumed to be 1. The following sets the dn variable to 1. If your number is different, then make the appropriate substitution.

    $dn=1
    
  • The following insures the USB drive does not have a partition style. If prompted, enter y.

    $do=get-disk -number $dn
    if ($do.partitionstyle -ne "raw") {clear-disk -number $dn -removedata -removeoem}
    
  • The following creates a GUID Partition Table (GPT) on the USB flash drive. If a Microsoft Reserve partition is created, then this partition is removed. If prompted, enter y.

    initialize-disk -number $dn -partitionstyle gpt
    $do=get-disk -number $dn
    if ($do.numberofpartitions -ne 0) {remove-partition -disknumber $dn -partitionnumber 1}
    
  • The following creates a HFS type partition, which is the same size as the 3.hfs file.

    $ps=(get-item 3.hfs).length
    new-partition -disknumber $dn -Size $ps -gpttype "{48465300-0000-11aa-aa11-00306543ecac}" -alignment 4096
    
  • The following command copies the HFS volume image in the 3.hfs file to the HFS partition on the USB flash drive.

    .\ddrelease64 if=3.hfs bs=1M of=\\?\Device\Harddisk$dn\Partition1 --progress
    
  • Close the "Administrator: Windows PowerShell" window.

References

1

In fact, there are very few ways that can be used to write DMG image file to a USB drive and have it to be bootable on a Windows computer. As far as i konw, some third party tools like Transmac, poweriso, etcher or sysgeeker's WonderISO.but none of them are free, I suggest you download the trail version and use it for 3 times without paying.

0

I was able to do this with Power ISO on Windows but it cost me $29.99

-- I created an ISO from the original install DVD and then went to tools => Create Bootable USB... Selected the OSX image Selected the USB drive to create the bootable image on Selected RAW mode

I popped it in my Desklamp iMac (DVD Drive busted from toddlers -- majority of OS was trashed by 5yo) and boom ready to install.

0

I had this problem with a friend computer, it was an old iMac and I'll tell you it is not going to be easy.
The first thing you have to do is make sure what model you have (the year when your computer has been released) then check on the official apple website to see what is the latest macOS or Mac OS X version available for you computer.
In most of the new mac computer, you can just press cmd+r while booting and the mac will automatically download everything you need to install the system, but the oldest does not have this tool.

In this case, you have to download the dmg file, that can be found on the web, for example, one websites that provides some macOS and Mac OS X is this (for El Capitan, if you need another version, I'm sorry but you have to search for it).
Here things start to get a little tricky.
First of all you have to flash the image on a USB drive, I recommend etcher, that works on everything (Mac, Linux and Windows too) it's extremely easy to use and you just need to select the drive and the image and etcher will do everything by itself, plus it's free here.

When the USB drive is ready you can plug it in you mac and press alt (option) while booting, you have inserted a firmware password, it will ask you to unlock the firmware by inserting that password, else it will take you to all the bootable drives, including your USB device.

If you see the mac logo with a stop icon over it, it means that you downloaded a too new version that is not supported from your mac, else it will start.
When it start, it won't install, saying that the system can't verify the downloaded image, that's why you have to navigate on the "utilities" menu on the top bar and open the terminal.
Now you have to choices, change the date & time, which can work, but may not.
That's basically because every image of mac has a certificate that can expire, so, if the certificate is expired you won't be able to make it work, unless you change the date (the date is different from mac version to mac version, so based on that you have to change it, usually just search for when was that version released and se the current date to that date or even one or two days later to make it work). Then try to install the system, if this does not work again, you can start the installation without verifying the image, but you should really trust the image you're using from being corrupted or modified (just to make sure the download went right, use the SHA-1 code to make the file has been downloaded right).
So, to proceed without verifying the image, from terminal, type in this command: sudo defaults write com.apple.frameworks.diskimages skip-verify true
then, start the installation. (Is possible that you won't need the sudo at the begin, in that case just remove it from the command and start from "defaults")

Now you should be able to install macOS from a USB drive...

Just a little thing, make sure to have formatted the disk before proceeding, I would recommend to make a partition that takes the whole disk in mac Journaled format, then if you want you will be able to encrypt the disk (the installer will ask you to do that later), instead, if the disk was encrypted before, you will have to insert the encryption key of the disk to continue the installation process.

Really hope this help, I spent a lot of hours to do this on a really old iMac from 2008... and now it works!
Good luck!

0

For those who failed to create bootable USB with TransMac, take a look at UUByte DMG Editor. I managed to create two bootable USB from macOS Mojave and Catalina DMG file and successfully installed them on respect Mac.

First, make sure the dmg file you downloaded is valid. Try your best to get it from reputable website like Apple, CNET, MacUpdate, etc. Secondly, download UUByte DMG Editor and insert a USB drive. Now, import DMG file and click Burn button to burn macOS dmg file to USB drive.

Lastly, plug the USB drive into Mac and press Option key to select the drive from startup menu. From there, you can start installing macOS from bootable USB drive.

My Testing Environment: Windows 10 Home/SanDisk USB 3.0 64G/macOS Mojave & Catalina DMG File

-1

In my humble opinion, the easiest and a free solution for creating bootable drives is Rufus.

1
  • read again title of this issue "Mac bootable USB drive using Windows?" then read again and again again you ...
    – user956584
    Commented May 24, 2019 at 11:00
-1

I've been struggling with the same problem but this works for me:

  1. convert the .dmg image with power iso to iso
  2. put the iso on a usb stick (drag it into your mac hard drive and mount it)
  3. format your usb stick with the disk utility tool. (Make sure the usb is partitioned as mac bootable then use use the image recovery and put your mounted OS X iso into the source and your usb as the location.)
  4. restart your computer while holding down the option key
2
  • The problem is, Mavericks is not a .dmg file. Yes, buried within the .app file is an InstallESD.dmg file, however it alone does not contain all of the necessary files to install OS X. You used to be able to burn InstallESD.dmg in 10.8 and prior, this changed with 10.9. support.apple.com/en-us/HT201372 Commented Jul 7, 2015 at 20:54
  • 2
    And also the question is about creating bootable USB flash from Windows. Your way is obviously for Mac. Commented Feb 23, 2016 at 7:27
-1

You can create bootable USB drive on Windows using POWER ISO. You will be able to download a copy of old one version of powerISO by provided links this tutorial.

You need pen drive of more than 8 GB.

http://www.makarandmane.com/computer/tips-and-tricks/apple-mac-os-x/create-bootable-usb-mac-os-x-installer-from-windows/

1
  • Answers on Ask Different need to be more than just a link. It's okay to include a link, but please summarize or excerpt it in the answer. The idea is to make the answer stand alone.
    – nohillside
    Commented Dec 27, 2016 at 9:27
-2

I've tried many tutorials on how to create a mac bootable USB drive from Windows but none of them worked. So, I've come up with my own solution that worked fine with any DMG I've tested. Please find the details on my github page.

2
  • 1
    Welcome to Ask Different! We're trying to find the best answers and those answers will provide info as to why they're the best. Explain why you think the link you provided will answer the question. Links can change and become outdated so we prefer the answers to not just be a link. See How to Answer on how to provide a quality answer. - From Review
    – fsb
    Commented Dec 27, 2016 at 5:34
  • 2
    July 2019 - link is dead.
    – Tetsujin
    Commented Jul 17, 2019 at 16:12

You must log in to answer this question.

Not the answer you're looking for? Browse other questions tagged .