6

As you read through this post, for reference, the machine on which I'm trying all of this is running Big Sur.

I was using Time Machine to back up an external drive that failed. Having purchased a new external drive, I'd like to restore my data to that drive. My initial attempt failed because I couldn't navigate to the other drive when entering TM. Heading out to the intertubes, I learned that it's not as simple as that; I learned that TM associated drives with UUIDs. Ok, that's fine, searching around some more I found that I can use tmutil to associate the old backup with the new drive. Reading several different threads, I saw that the command that I need to use is as follows:

sudo tmutil associatedisk "/Volumes/All Data" "/Volumes/backups/Backups.backupdb/Pariah/Latest/All Data"

Where "All Data" is the name of the volume and "Pariah" the name of my machine. However, when I ran the command, I received the following error:

/Volumes/backups/Backups.backupdb/Pariah/Latest/All Data: Not a snapshot volume

Ok... It seemed to work for a number of people, so why not me? Digging into it a bit more, it turns out that

/Volumes/backups/

doesn't exist. Going to see what is there, I find that there is a .timemachine directory. Checking out what it contains, I see that there is a directory named using a UUID. I feel it's safe to assume that is the UUID of my old drive. That belief is confirmed (I think) when I see that it contains what looks to be backups. What I don't see anywhere in that directory structure, however, is a Backups.backupdb file. Running locate or find doesn't seem to find it, either.

So what do I need to do to associate the previous Time Machine backup with the new external drive? I was thinking that I could just rename the directory to that of the UUID of my new drive. However, I'm afraid that will cause problems because there is obviously a database involved and just renaming the directory won't do anything there.

Any advice or instruction anyone can provide to help me with this would be most appreciated!


Update on January 18, 2023

The ls -al command when executed under /volumes yields the following:

drwxr-xr-x   6 root  wheel  192 Jan 14 03:17 .
drwxr-xr-x  20 root  wheel  640 Jan  1  2020 ..
drwxr-xr-x   3 root  wheel   96 Jan 18  2022 .timemachine
drwxrwxr-x@ 17 root  admin  646 Jan 14 10:34 All Data
lrwxr-xr-x   1 root  wheel    1 Jan 11 12:06 Macintosh HD -> /
drwxrwxr-x@  6 plex  staff  192 Jan 13 20:44 Media TM

Please note that the UUID-looking directory name inside the .timemachine directory is the volume UUID of the external drive on which the Time Machine data resides, not my old drive.

Pariah:Volumes plex$ cd .timemachine/
Pariah:.timemachine plex$ ls -al
total 0
drwxr-xr-x    3 root  wheel    96 Jan 18  2022 .
drwxr-xr-x    6 root  wheel   192 Jan 14 03:17 ..
drwxr-xr-x  102 root  wheel  3264 Jan 13 20:45 67417F0D-02BA-4DCB-8403-1D90C8181750

Pariah:.timemachine plex$ cd 67417F0D-02BA-4DCB-8403-1D90C8181750/
Pariah:67417F0D-02BA-4DCB-8403-1D90C8181750 plex$ ls -al
total 0
drwxr-xr-x  102 root  wheel  3264 Jan 13 20:45 .
drwxr-xr-x    3 root  wheel    96 Jan 18  2022 ..
drwxrwxr-x    4 plex  staff   128 Dec 16  2021 2021-12-16-065854.backup
drwxrwxr-x    5 plex  staff   160 Dec 23  2021 2021-12-23-161541.backup

with dates coming forward for all the backups.

The name of the volume containing the backups is called Media TM while the external drive to which I'm trying to restore is called All Data. That is the same name I used for my old drive -- the one that recently died. Going into that volume:

Pariah:Volumes plex$ cd Media\ TM/
Pariah:Media TM plex$ ls -al
total 144
drwxrwxr-x@ 6 plex  staff    192 Jan 13 20:44 .
drwxr-xr-x  6 root  wheel    192 Jan 14 03:17 ..
drwx------  4 root  wheel    128 Dec 15  2021 .Spotlight-V100
drwxr-xr-x@ 7 root  staff    224 Jan 13 20:20 2023-01-13-202029.previous
drwxr-xr-x@ 8 root  staff    256 Jan 13 20:45 2023-01-13-204431.inprogress
-rw-r--r--@ 1 root  staff  70437 Jan 13 20:20 backup_manifest.plist

In addition, upon request, here are the contents of the 2023-01-13-202029.previous directory in /volumes/Media TM.

Pariah:2023-01-13-202029.previous plex$ ls -al
total 424
drwxr-xr-x@  7 root  staff     224 Jan 13 20:20 .
drwxrwxr-x@  6 plex  staff     192 Jan 13 20:44 ..
-rw-r--r--   1 root  staff  163376 Jan 13 20:17 .A574B396-3FB8-36D7-B0D9-721787BA5552.eventdb
-rw-------   1 root  staff     852 Jan 13 20:20 .com.apple.timemachine.checkpoint
-rw-r--r--   1 root  staff   47546 Jan 13 20:17 .exclusions.plist
drwxrwxr-x@ 16 root  wheel     512 Jan 10 20:19 All Data
drwxr-xr-x@ 17 root  wheel     544 Jan 13 20:45 Macintosh HD - Data
Pariah:2023-01-13-202029.previous plex$

Nowhere, in all of that, do I see Backups.backupdb.

4
  • @Alper, apologies, the above is for the wrong machine. It was for the machine I was one as I was commenting. I had switched while I was doing something else and I was distracted. I've altered your update to reflect the correct structure.
    – Christoph
    Commented Jan 17, 2023 at 22:14
  • @Alper, I've updated the post. And if I go into the All Data directory, I see what appears to be the directories and files that was on my old external drive. So it seems like I can restore my data just by copying the data in that directory using Finder? But how do I associate those backups with the new drive?
    – Christoph
    Commented Jan 18, 2023 at 20:16
  • I have an idea but I am not 100% sure it will work and I don't want to endanger your backups. I have found out a good answer to a question similar to yours in terms of Backups.backupdb not being available and, though it would not help you 100%, I suggest you take a look at it if you have not already done so. I have also referred your question to the owner of that answer. I suggest waiting for a bit to see if he can help. On another note, it might be better if you delete your comments that you have already incorporated in your original post.
    – Alper
    Commented Jan 18, 2023 at 21:13
  • Well, that explains why it's not there. And I've seen references to the points brought up in that post but what's confusing about the entire situation is that even on pages that *appear* to be in the context of "Big Sur" (and later), the commands for tmutil in terms of associating the old TM with the new drive still referenced Backups.backupdb. Even the man page for tmutil in "Big Sur" still references it.
    – Christoph
    Commented Jan 19, 2023 at 0:38

2 Answers 2

5

Update: I have modified the first paragraph and added a section at the end.

This answer was accepted whilst limited to restoring your data, as in the question title. It now also covers associating the restored disk with the existing backup so that future backups continue without duplicating disk space on the Time Machine (TM) disk.

Firstly, forget everything you have read about Backups.backup which only applies to backups where the TM disk is using the HFS+ format.

From Big Sur onwards the format for new backups is APFS. APFS formatted backup disks use snapshots for each backup. Each snapshot is an APFS volume - it is not a directory.

An aside: The man page for tmutil covers backups in both formats with no clear distinction between them. As a consequence, it can be very confusing except as a command reminder for those who already understand TM in some detail.

Before doing a restore, turn TM backup off. Just so that this doesn't confuse or impact performance while you are restoring.

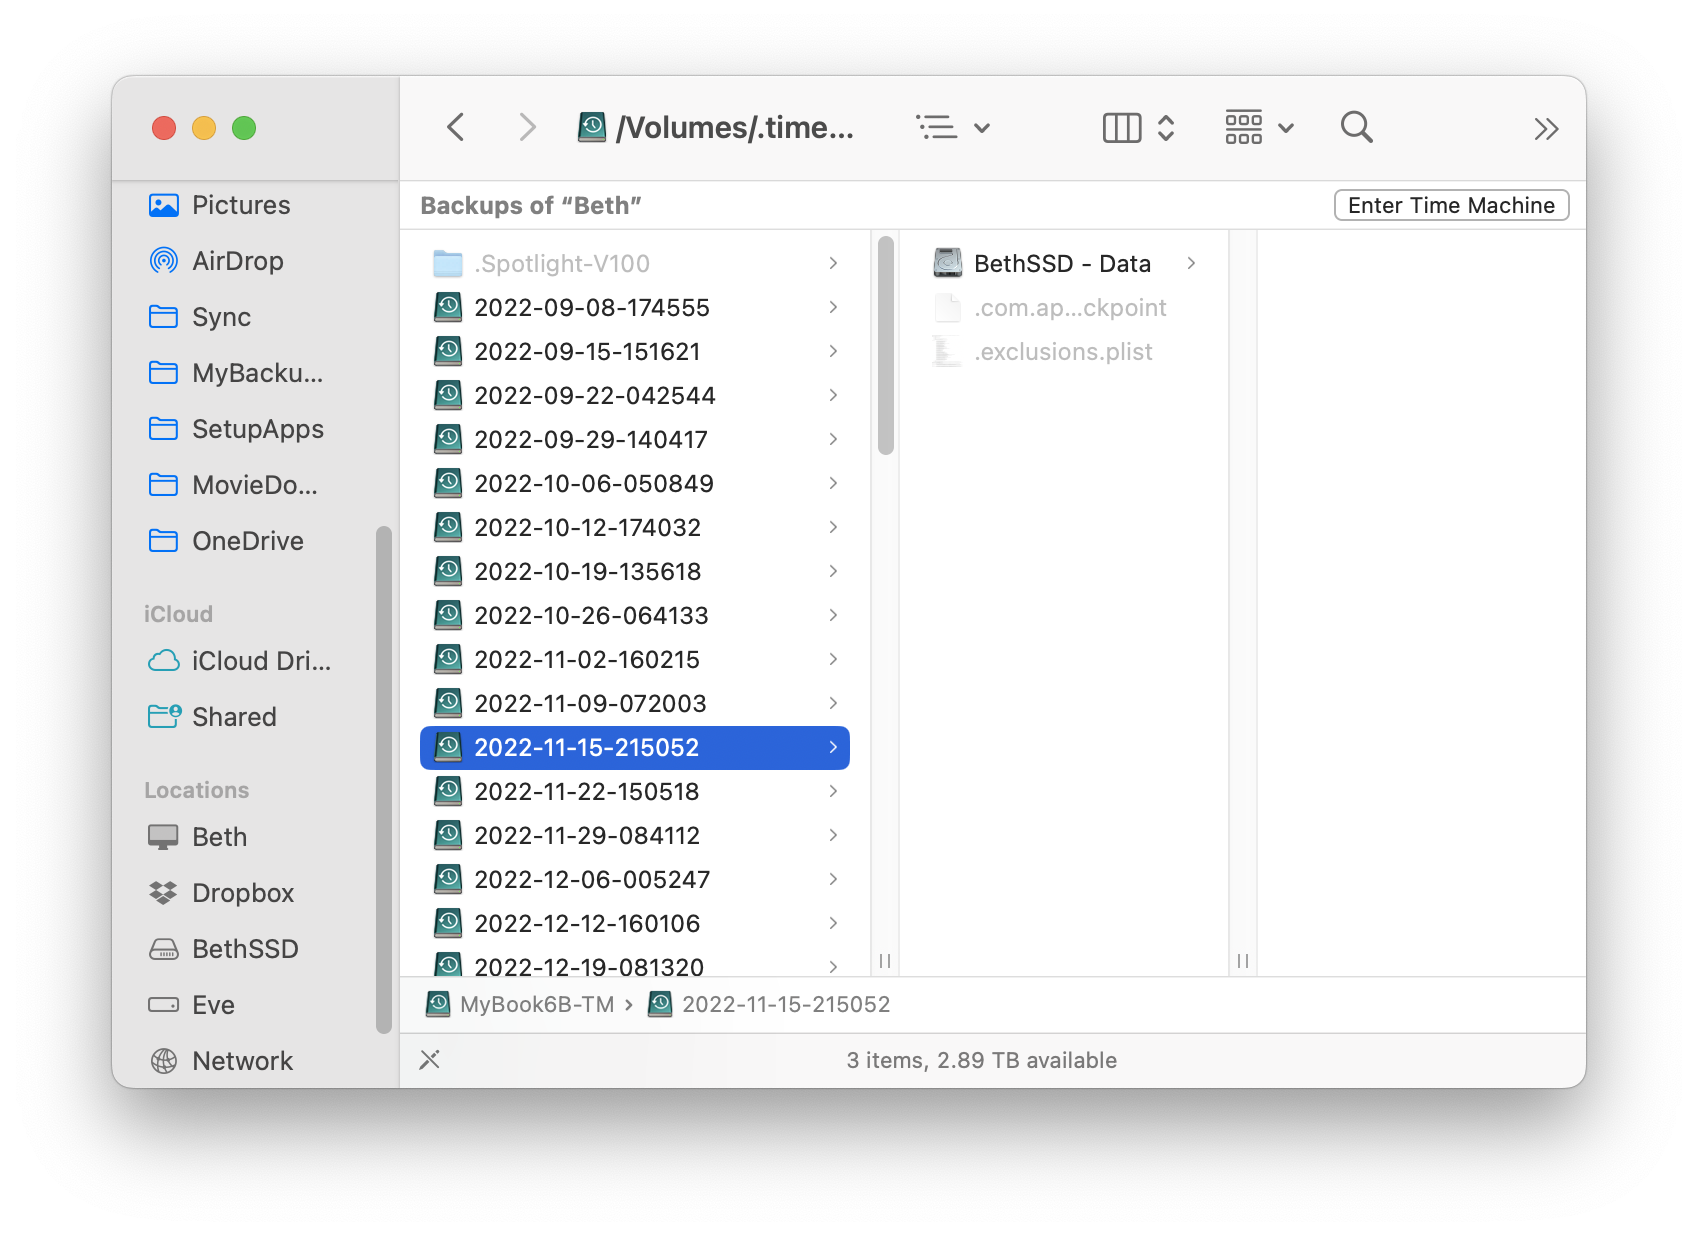
Use Finder to navigate the TM disk. In Finder your Media TM disk will look something like my MyBook6B-TM:

enter image description here

Each backup is a snapshot with a “disk & clock” TM icon.

Choose the one you want to recover from and navigate it in the usual way with Finder. Then just drag and drop folders or files from there to another Finder window with your new disk.

Drilling down can be a little slow at times with a beachball - be patient.

At this point you should on your way to recovering files from your Media TM backup disk.

As a little more background, behind the scene, the snapshot has been mounted (like it was a disk). In the Finder window above I could hover over the /Volumes/.time... at the top to see the mount point where the snapshot has been mounted. It is this location that you can (if needed) use in Terminal by typing cd and dragging the disk-like icon to Terminal. This is what I have done below. I did not type the /Volumes....

gilby@Beth/Users/gilby% cd /Volumes/.timemachine/02EED3F7-B8DF-44BB-8EA6-28D7822B1A4B/2022-11-15-215052.backup/2022-11-15-215052.backup
gilby@Beth/Volumes/.timemachine/02EED3F7-B8DF-44BB-8EA6-28D7822B1A4B/2022-11-15-215052.backup/2022-11-15-215052.backup% ls -lah
total 136
drwxr-xr-x@  5 root  wheel   160B 15 Nov 21:43 .
drwxrwxr-x@  5 root  wheel   160B 15 Nov 21:50 ..
-rw-------   1 root  wheel   806B 15 Nov 21:50 .com.apple.timemachine.checkpoint
-rw-r--r--   1 root  wheel    62K 15 Nov 21:43 .exclusions.plist
drwxr-xr-x@ 20 root  wheel   640B 15 Nov 21:50 BethSSD - Data
gilby@Beth/Volumes/.timemachine/02EED3F7-B8DF-44BB-8EA6-28D7822B1A4B/2022-11-15-215052.backup/2022-11-15-215052.backup%

This only works correctly because the snapshot has been mounted due to Finder asking to see what is inside the snapshot. It can be mounted in other ways, but via Finder is easy.

A final point coming back to what you have already discovered. The /Volumes/.timemachine folder contains the mount points at which backup snapshots can be mounted. But navigating with cd and ls is not sufficient to mount the snapshot.

Associating the new disk with the existing TM backup:

I was hesitant to describe how to associate the new disk with the TM backup so that future backups would just add to the existing backup without duplicating everything. But thanks to @Christoph being prepared to take risk, we have established how to associate the disk. This addendum is taken from the discussion in comments.

The man page for tmutil does give the commands for associating the disk, but the example is only correct for HFS+ format TM disk. There is no example for APFS.

In this case the destination TM disk is formatted APFS and correct command (specific to the configuration in the question) is:

sudo tmutil associatedisk "/Volumes/All Data" "/Volumes/Media TM/2023-01-13-202029.previous/All Data"

For others wanting to do this replace the All Data with the name of the recovered data disk.

The second parameter is not so easy, but see the last two commands in the question which show the results of ls -la "/Volumes/<TM disk>" and ls -la "/Volumes/<TM disk>/<date-time>.previous".

10
  • this is great. Thank you very much. So is there no way of associating my old backups with my new drive? So that when TM runs another backup, it doesn't create a parallel structure for the new drive? I was reading around and saw that one of the ways that TM saves space with APFS is by using hard links. If TM sees this is something altogether different then won't those associations be lost and thus making it so that more space is used than would otherwise be needed?
    – Christoph
    Commented Jan 19, 2023 at 17:52
  • 1
    @Christoph I believe (but have never tested/done this myself) the command you want is sudo tmutil associatedisk "/Volumes/All Data" "/Volumes/Media TM/2023-01-13-202029.previous/All Data". You may need to disable SIP.
    – Gilby
    Commented Jan 20, 2023 at 6:36
  • 1
    @Gilby, Alper, I'm happy to be the guinea pig and I'm happy to report that the command suggested above appears to have worked! :) I'm not at all sure why this had to be so difficult. Why isn't this included in the man page and/or on any of their support pages. I want to thank you both for all of your help. I really, really appreciate it!
    – Christoph
    Commented Jan 22, 2023 at 15:33
  • 1
    @Christoph So glad (and relieved) that it worked!!
    – Gilby
    Commented Jan 22, 2023 at 22:54
  • 2
    @Alper Thanks for confirming/encouraging the use of my suggestion.
    – Gilby
    Commented Jan 24, 2023 at 2:31
0

I was also trying to recover a backup from my external drive.

The goal was to transfer backup data to a fresh external drive. The old drive was not working anymore.

  1. Go to Browse Time Machine Backups
  2. Go back in time when the external drive was still working.
  3. In the left side menu, select Locations your Machine, and look for your computer´s name.
  4. When select your computer you should also see the external drives inside the Time Machine backup!
  5. Right-click and restore to your new drive.

More detailed instructions are available at Time Machine in Sonoma: Back up and restore external volumes.

You must log in to answer this question.

Not the answer you're looking for? Browse other questions tagged .