22

In setting up a new Time Machine, how can I limit how much disk space Time Machine has access to? I am only interested in answers relevant to Big Sur's change to AFPS for Time Machine.

I have no reason to expect this has changed, other than hearsay this summer. I am asking this question because I cannot find any sources that directly address the issue of limiting Time Machine's size in Big Sur. The change in file format seems like a big enough update that it could change how Time Machine operates.

I am looking for an answer that "definitively" answers how to limit Time Machine in Big Sur. Even if the answer is the same as in Mojave and Catalina, that is still valuable information.

With Time Machine's support of APFS destinations in Big Sur, how can I limit the size of Time Machine data on the external drive?

8
  • I’ve tried to clean this up with a minor edit, but there seem to be a few side questions here deeper than “is this old command effective anymore?” (Which I think the answer is “nope”) . What precisely are you seeking to limit? APFS has copy on write and deduplication and sparse files so the size of a file on disk is not necessarily in any way as direct a link to causing a reduction in usable space on disk as in the past. Even deleted files take space now while they are in a snapshot. Can you sharpen this - perhaps with specific limit you seek to enforce based on specific disk sizes?
    – bmike
    Commented Jan 14, 2021 at 11:36
  • Also, if my comment is actually the answer you seek, I could expand on “don’t do that anymore - instead do this”.
    – bmike
    Commented Jan 14, 2021 at 11:44
  • In my case a limit is needed as on a shared disk I do not want TM to grow to take it all. When it hits a limit it should delete older backups. I don't need a complete history
    – mmmmmm
    Commented Jan 14, 2021 at 12:24
  • @bmike I have no idea what this means: “ APFS has copy on write and deduplication and sparse files”
    – Unrelated
    Commented Jan 14, 2021 at 17:55
  • Exactly. Which is why this is more a back and forth to pin down what you are trying to do IMO and not even answerable based on the details.. questions like “teach me a lot about X are hard to do so no judgement, just I’m not even sure I can help you here yet.
    – bmike
    Commented Jan 14, 2021 at 18:53

9 Answers 9

12

Yes it's possible, but not by the Disk Utility, because you can't set a role to your Volume by this way. But the diskutil command by the terminal application do it very well.

For example, i've a Container of 80 Go and i want create a Time Machine volume how will not exceed 20 Go :

xxxxxxx ~ % diskutil ap list disk4

|
+-- Container disk4 8C53B410-FC36-4221-9F13-F528C24CA4EC
    ====================================================
    APFS Container Reference:     disk4
    Size (Capacity Ceiling):      80000000000 B (80.0 GB)
    Capacity In Use By Volumes:   121966592 B (122.0 MB) (0.2% used)
    Capacity Not Allocated:       79878033408 B (79.9 GB) (99.8% free)
    |
    +-< Physical Store disk3s5 D6E20B9A-34FF-462E-8AEE-5648523C1E5D
    |   -----------------------------------------------------------
    |   APFS Physical Store Disk:   disk3s5
    |   Size:                       80000000000 B (80.0 GB)
    |
    +-> No Volumes

In the following command

APFSX is for the APFS Case-sensitive format (for the saves TM)

-quota 20g limits growth to 20 Go for this volume

-role T indicate that the volume is a "Backup TM"

xxxxxxx ~ % diskutil ap addvolume disk4 APFSX Time_Machine_BS -quota 20g -role T

Will export new APFS (Case-sensitive) Volume "Time_Machine_BS" from APFS Container Reference disk4 with a 20000000000-byte quota
Started APFS operation on disk4
Preparing to add APFS Volume to APFS Container disk4
Creating APFS Volume
Created new APFS Volume disk4s1
Mounting APFS Volume
Setting volume permissions
Disk from APFS operation: disk4s1
Finished APFS operation on disk4

Then

xxxxxxx ~ % diskutil ap list disk4

|
+-- Container disk4 8C53B410-FC36-4221-9F13-F528C24CA4EC
    ====================================================
    APFS Container Reference:     disk4
    Size (Capacity Ceiling):      80000000000 B (80.0 GB)
    Capacity In Use By Volumes:   122675200 B (122.7 MB) (0.2% used)
    Capacity Not Allocated:       79877324800 B (79.9 GB) (99.8% free)
    |
    +-< Physical Store disk3s5 D6E20B9A-34FF-462E-8AEE-5648523C1E5D
    |   -----------------------------------------------------------
    |   APFS Physical Store Disk:   disk3s5
    |   Size:                       80000000000 B (80.0 GB)
    |
    +-> Volume disk4s1 8E6FC6CF-149A-4A8C-BD4E-228953A8C07F
        ---------------------------------------------------
        APFS Volume Disk (Role):   disk4s1 (Backup)
        Name:                      Time_Machine_BS (Case-sensitive)
        Mount Point:               /Volumes/Time_Machine_BS
        Capacity Consumed:         704512 B (704.5 KB)
        Capacity Reserve:          None
        Capacity Quota:            20000002048 B (20.0 GB) (0.0% reached)
        Sealed:                    No
        FileVault:                 No

If there is no volume selected for Time Machine saves, immediately TM proposes to use this volume.

After the first save (small because i'm on a test Big Sur install) the result is :

xxxxxxx ~ % diskutil ap list disk4

|
+-- Container disk4 8C53B410-FC36-4221-9F13-F528C24CA4EC
    ====================================================
    APFS Container Reference:     disk4
    Size (Capacity Ceiling):      80000000000 B (80.0 GB)
    Capacity In Use By Volumes:   6738415616 B (6.7 GB) (8.4% used)
    Capacity Not Allocated:       73261584384 B (73.3 GB) (91.6% free)
    |
    +-< Physical Store disk3s5 D6E20B9A-34FF-462E-8AEE-5648523C1E5D
    |   -----------------------------------------------------------
    |   APFS Physical Store Disk:   disk3s5
    |   Size:                       80000000000 B (80.0 GB)
    |
    +-> Volume disk4s1 8E6FC6CF-149A-4A8C-BD4E-228953A8C07F
        ---------------------------------------------------
        APFS Volume Disk (Role):   disk4s1 (Backup)
        Name:                      Time_Machine_BS (Case-sensitive)
        Mount Point:               /Volumes/Time_Machine_BS
        Capacity Consumed:         6616440832 B (6.6 GB)
        Capacity Reserve:          None
        Capacity Quota:            20000002048 B (20.0 GB) (33.1% reached)
        Sealed:                    No
        FileVault:                 No

The limitation is that it's impossible, to my knowledge, to modify the quota without suppress and re-create the TM volume.

5
  • 1
    As of Ventura 13.3.1, the moment that the first backup starts, the quota setting is cleared. This happens no matter whether you use the TimeMachine GUI or the tmutil CLI.
    – hmijail
    Commented Apr 19, 2023 at 11:30
  • 1
    So if setting the quota doesn't work, are we going to have to go with @colonoclick's solution of partitioning? apple.stackexchange.com/a/411243/6278
    – huyz
    Commented Jun 9, 2023 at 13:26
  • @hmijail this is the real issue and nobody is talking about it...? This may offer a solution, I'm still testing it to see how well it works: discussions.apple.com/thread/255220939?sortBy=best Commented Mar 3 at 16:58
  • 1
    @haventchecked the Feedback report I filed with Apple (FB12130327) is still seemingly untouched ~1 year later (just like every other report I have filed in the last few years), so Apple's Q&A somehow manages to look more and more useless. So let's hope that the solution you linked to works - please report!
    – hmijail
    Commented Mar 4 at 3:15
  • @hmijail It did not work for me even though it said the quota was in effect. I had a 4TB external drive that should have had a 1.5TB quota and it was filled to 3.8TB with a year of backups. There was no cleanup of old backups after the quota was set. I ended up partitioning the drive as I can't find any other way to solve this. On a different apple RAID asst. drive (3 drives in JBOD) I had to use a 1.5TB sparse bundle because there was no way to create an additional partition. Commented Mar 4 at 16:50
5

You can set a quota by getting the long hexadecimal id from the command

tmutil destinationinfo

and then using

sudo tmutil setquota {ID} {SIZE_IN_GB}

This quota can then be changed later by using sudo tmutil setquota again! 🥳 You can also immediately see the quota in the Time Machine Settings or in tmutil destinationinfo.

This can also require granting the "Full Disk Access" permission from the terminal, but the command guides you through that. You can also read man tmutil for a few more details.

In my case, I created the Time Machine without a quota and set the quota later in the way I described above. I'm not sure whether it would work if you set a quota when creating a volume, but maybe?

I picked this up from How can I change Time Machine quota?

1
  • Thanks, you just helped me out - this was the answer I was searching for :)
    – Pete
    Commented Oct 4 at 8:53
4

TL;DR

You can do this:

  1. Create an APFS Time Machine volume as normal.
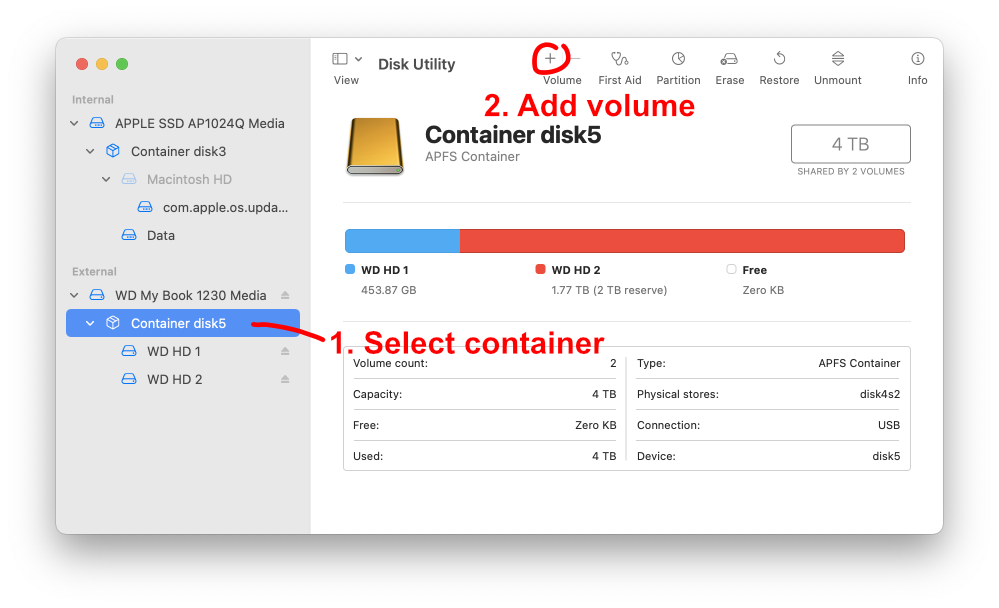
  2. In Disk Utility, add one or more AFPS volumes to the same container that includes the Time Machine volume, and set a Reserve Size for each (see below for step-by-step instructions). This will effectively limit the size of the Time Machine volume even though it doesn't itself have an explicit quota size.

Advantages of this approach

  • Doesn't require the Terminal.
  • Relies purely on APFS volumes, without requiring adding a GUID partition (as when adding an APFS Container partition or HFS+ partition).
  • You can adjust the maximum size of the Time Machine volume at any time by adding/removing other APFS volumes.

For example, if the drive has a 4 TB capacity and you want to set aside at least 2 TB for non-TM files, create an APFS volume with a 2 TB Reserve Size. If you want to limit Time Machine to 1 TB, create a third APFS volume with a Reserve Size of 1 TB. If later on you decide you want to increase the Time Machine space limit to 1.5 TB, you can delete that third APFS volume and add a new APFS volume with a Reserve Size of 500 GB.

APFS Volumes              Reserve Size   Effective Size Limit
-----------------------   ------------   --------------------
Volume 1 (Time Machine)        N/A               1 TB
Volume 2 (other files)        2 TB
Volume 3 (can be empty)       1 TB

    |
    | Remove and re-add Volume 3 with a lower Reserve Size
    v

APFS Volumes              Reserve Size   Effective Size Limit
-----------------------   ------------   --------------------
Volume 1 (Time Machine)        N/A             1.5 TB
Volume 2 (other files)        2 TB
Volume 3 (can be empty)     500 GB

If desired, you could even eventually move your other files off of the drive ("Volume 2" in this example), and allow your Time Machine volume to grow to fill the full drive.

Testing performed

I tested this on macOS Big Sur (11.6.1 and 11.6.2) and confirmed that Time Machine (1) will not back up successfully if it requires space reserved by other AFPS volumes, and (2) will prune older backups to free up space for new backups. (In my tests I was giving Time Machine very little space and had very few past backups available to prune, so it would often fail to back up, but I assume that with more space and a normal-length backup history it would always be able to find old backups to prune when needed to free up space for new backups.)

Step-by-step instructions for adding APFS volumes with a Reserve Size

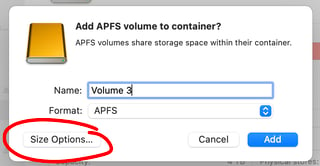
  1. In Disk Utility, select the container that includes the Time Machine volume, and add an additional APFS volume to it. (Do so by choosing Edit > Add APFS Volume… or by clicking the + symbol under "Volume" in the toolbar.) Add volume in Disk Utility
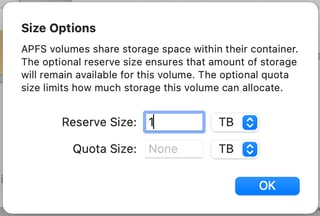
  2. Click the "Size Options…" button, set the Reserve Size, and click "OK".

Note: After you set a Reserve Size, click the "Size Options…" button again to verify that the correct number is still there! Disk Utility will only allow TB to be set to 2 decimal places, will not allow fractional GB values, and will replace "1000" with "1,000" and then replace "1,000" with "1". I know, seriously.

Size Options button

Set Reserve Size

  1. Click "Add".
3
  • The problem is that I want several APFS volumens and do not want to define the size. If I had to reserve space I might as well create separate partitions
    – mmmmmm
    Commented Jan 21, 2022 at 14:48
  • @mmmmmm Yeah, my solution is not perfect. But some may find it more flexible, depending on their particular situation, since adding/removing APFS volumes is easier than shrinking/enlarging partitions.
    – DavidArndt
    Commented Jan 21, 2022 at 18:39
  • This is a useful temporary solution if if one has forgotten to put a quota on the Time Machine volume and doesn't want to start over by wiping out those backups.
    – huyz
    Commented Jun 9, 2023 at 13:14
3

I'm a recent Windows to 2021 MacBook Pro convert. Not knowing it was impossible, I managed to stumble on a method using Disk Utility.

  • Launch Disk Utility
  • Erase the disk and create “Time Machine Backup” volume
  • Notice that no option to limit size is available.
  • Delete the Time Machine Backup volume just created.
  • Add a volume named Time Machine Backup and supply size constraints.
  • Add additional volumes with or without size constraints.
  • Launch Time Machine and Select Disk ->Time Machine Backup
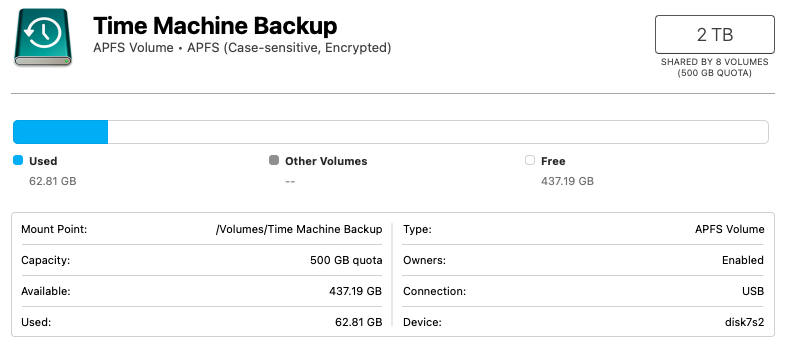
  • Here's what I ended up with. Seems to work. Disk Utility
1
  • Is the difference between the two attempts because the first attempt actually creates an APFS container while the second attempt creates an APFS volume inside the existing container?
    – huyz
    Commented Jun 9, 2023 at 13:19
2
+25

You can use the same strategy you would use with any of the other drive formats, namely creating a new partition.

Create a new APFS partition (aka container) with a single volume (as opposed to creating a new volume within an existing APFS container.) Time Machine will expand the volume such that it uses the entire container, but it cannot use any space not belonging to the container in which its volume resides.

1

The answer you linked to of setting an APFS volume quota is the only strategy I've found.

Note that this is not partitioning the drive, but rather a volume within an APFS container. The APFS container is the partition on the disk, then within are APFS volumes which can be added and removed at will.

Disk space is shared between APFS volumes on a container, so you can create a new volume within a container and move files from one volume to another without needing double the disk usage. As files are moved from one volume to another, the total size of files in the container does not increase, as one volume gets smaller at the same time as the other volume gets larger.

This makes it very easy to move your Time Machine backup to a new APFS volume with a quota set, within the same APFS container. No disk partitioning required.

1
  • 3
    Problem is when I did this - I set the quota in Disk Utility and it showed. Then when I chose that volume in Time Machine it redid the quota back to the whole diak (I have other volumes which do keep the quota)
    – mmmmmm
    Commented Jan 13, 2021 at 23:51
1

Apple still supports HFS+ Destination disks so the old method will still work on Big Sur. With macOS 11 you are correct that APFS is preferred and Apple explicitly shows how to split an APFS disk so that not all the disk is used for backup space.

Note: The entire APFS disk is reserved for Time Machine backups. If you want to store files other than the Time Machine backup on the same physical device, use Disk Utility to create an additional APFS volume on the disk. The two volumes then share the available space.

In the above linked pay attention to the two fields - reserve and quota:

If you want to manually manage APFS volume allocation, click Size Options, enter values in the fields, then click OK.

  • Reserve Size: The optional reserve size ensures that the amount of storage remains available for this volume.
  • Quota Size: The optional quota size limits how much storage the volume can allocate.

You could reserve 100 GB so that no other container deprives your backup space of a minimum of 100 GB and you could also or just add a Quota of 500 GB to make sure your Time Machine volume never consumes more than 500 GB of space from the shared container.

3
  • 1
    Yes I have done that but..... The issue is that that is two different documents both are individually correct. The problem that exists is that setting up a Time Machine removes the quota from the Time Machine volume. Yes if you have one and only one other volume you can set its Reserve Size and hope that stops the TM
    – mmmmmm
    Commented Jan 14, 2021 at 20:16
  • I’ll see if I can reproduce that @mmmmmm if so I’ll certainly file a bug. Seems reasonable for quotas to not get removed. I personally always have two drives for Time Machine so the idea of a quota isn’t helpful to me, but I can see how you and others really depend on it.
    – bmike
    Commented Jan 14, 2021 at 21:31
  • Oh I might have two drives - they are just so much bigger than the SSD
    – mmmmmm
    Commented Jan 14, 2021 at 22:51
0

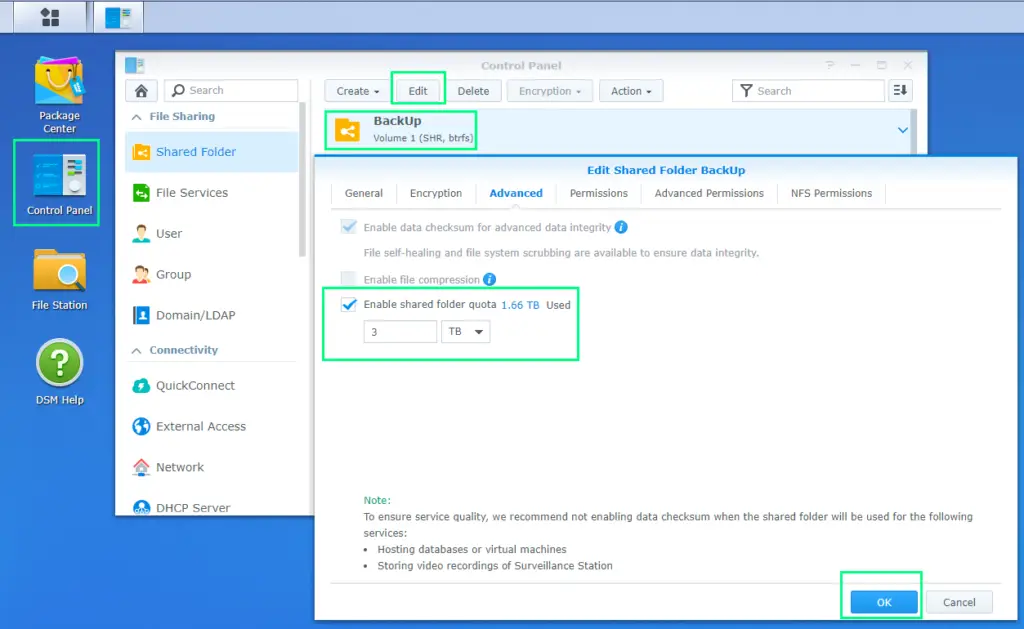
For anyone trying to limit this on their Synology NAS, there is a nice little setting in your Synology shared folder to limit this: enter image description here

Image taken from part 4: https://dongknows.com/how-to-keep-time-machine-storage-under-control/

-1

I tend to prefer sparsebundles for TimeMachine backups, because they are more flexible. For instance, they can be encrypted without having to encrypt the entire partition or use them on a USB drive and later copy them to a NAS server. Also they can reside on drives with different file systems, such as exFAT.

Sparsebundle images can be limited in size or resized easily, as discussed here for example. That means you can use Disk Utility (click on Images > Resize) or the Terminal:

hdiutil resize -size 30g ~/Documents/filename.sparsebundle
5
  • 1
    Any TM backup can be encrypted, TM even reminds you about this the first time you run a backup on a new disk.
    – nohillside
    Commented Jan 14, 2021 at 9:22
  • @nohillside Thanks for the comment, I changed my answer a bit.
    – n1000
    Commented Jan 14, 2021 at 9:37
  • I have used Sparsebundles ona NAS - they corrupt every few months
    – mmmmmm
    Commented Jan 14, 2021 at 12:22
  • @mmmmmm I have no experience if this occurs more often than on regular backup disks. Normally I make a copy of the empty sparsebundle image at the beginning and keep it around. Once the main image is full or gets corrupted, I archive & replace it.
    – n1000
    Commented Jan 14, 2021 at 12:32
  • Not sure of the downvote :( This is a viable method to limit the backup size. It may come with tradeoffs, but I would argue it answers the question. Also, I have been using this method for years and only once had a corrupted sparsebundle.
    – n1000
    Commented Aug 12, 2021 at 15:40

You must log in to answer this question.

Not the answer you're looking for? Browse other questions tagged .