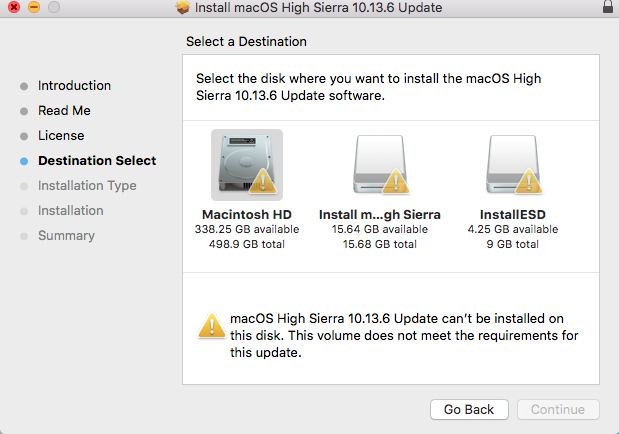
some days ago I was in the same situation as the original poster.
I had tried everything under the sun, and I was starting to think about not trying the update anymore... But then I had some revelation. I said: "what would it happen if I tried to install the cumulative update via Recovery mode, from some spare USB I have?"
And that's exactly what I did. Spoiler: I SUCCEEDED (yay!). So I'm going to list here the steps I can remember I did.
0.- FIRST OF ALL, THE NEEDED DISCLAIMER: DO A BACKUP OF YOUR MAC SENSITIVE DATA, ETC... I'M NOT RESPONSIBLE FOR YOUR ACTIONS, LOST DATA, ETC... IF SOME STEP IS UNCLEAR, CALL SOMEONE WHO UNDERSTANDS THE IMPLICATIONS OF SAID STEP. THE WHOLE PROCESS WORKED FOR ME, BUT I HAVE NO IDEA IF IT WILL WORK FOR YOU AND YOUR MAC. The "TERMINAL" application will be used in the process. If using it seems as black magic for you, call someone who understands how to launch programs and commands via Terminal.
Download the .dmg file we want to install from Apple, in our case "10.13.6 incremental update" from Apple [https://support.apple.com/kb/DL1970]
Once it finishes downloading, double click onto the .dmg file. A new .pkg file should appear when the .dmg file gets mounted.
Get a spare USB stick (with at least as much free space as the size of our new .pkg file), and copy this .pkg file onto the USB stick.
Learn how to boot your Mac into Recovery Mode. If you already know, go to the next step, if not google it.
Boot your Mac in Recovery mode. Once you do it, it will present you with some random tools on the upper part of the screen, we should look for "Terminal", and launch it.
Once we are inside "Terminal", we need to go where our USB stick is mounted. Typically it should appear under /Volumes/USB_STICK_NAME [or whatever name you used to label your USB STICK]. do some "ls -alcrt" and double check our "10.13.6 incremental update.pkg" file can be found there.
Now, still in Terminal, we will must launch the unatended .pkg installer typing this:
installer -allowUntrusted -verboseR -pkg "10.13.6_incremental_update.pkg" -target /Volumes/OUR_HIGH_SIERRA_DISK_MOUNT_POINT
BEFORE YOU TYPE THIS COMMAND, some additional explanations:
- We should launch this 'installer' command with "sudo" but, as booting from Recovery and launching Terminal already makes us root, there will be "no need for sudo".
- -allowUnstrusted parameter is probably not needed (as the .pkg file is an Apple official package).
- The name of the .pkg file I typed above is invented, just type whatever name your .pkg file has. Spaces are important, so let's type the .pkg file name BETWEEN QUOTES just in case.
- The "target" will be the disk where our working High Sierra installation lives, typically a mount point under the Volumes folder. DOUBLE CHECK THE NAME OF YOUR WORKING HIGH SIERRA MOUNT POINT, typically it is "Macintosh HD", but you might have changed it...
Again, we will finally double check on screen all the parameters of this command are as expected.
Then we'll run it, pressing enter.
Once the long 'installer...........' command starts running, a text mode installation will start. Some on screen messages will appear. The whole process takes around 10 minutes...
Once it finishes (let's hope sucessfully), your Recovery Boot will ask you to reboot your machine. Confirm this action and boot AFTER HAVING REMOVED YOUR USB STICK (in case it was bootable, in case you didn't do it before).
If everything goes ok, a new "high sierra" version should have become installed. You'll be somehow sure when macOS shows you the "typical first steps" screens before the login screen appears.
Once you dismiss these tutorial slides, your old login screen will appear, and you will be able to log in.
After typing your correct credentials, you should click on your top left apple icon (top bar), to check if your High Sierra version is finally 10.13.6, instead of whatever old version you started with, before this manual update actions.
ENJOY!
PS: AGAIN, IT'S A SOMEHOW DELICATE AND POTENTIALLY DESTRUCTIVE PROCESS. DO A BACKUP, AND CALL YOUR OSX TECH PERSON/FRIEND IN CASE YOU DON'T UNDERSTAND WHAT WILL BE DONE TO YOUR MAC.
PS2: In case you're using a hackintosh, you might additionaly need to mess with clover (apart from my steps) to make your machine boot as we want throughout the different parts of the process.
PS3: The version I was trying to update was a 10.13 High Sierra one... You should try to install this cummulative update if your current High Sierra version is 10.13, 10.13.1, 10.13.2, 10.13.3, 10.13.4 or 10.13.5.
Don't try to upgrade a 10.12.X Sierra installation (Just in case someone tries!)

