Time Machine is the preferred method to transfer data to another Mac. It is reliable and easy to use.
Since you can't use Time Machine in your setup, I'd recommend a procedure that relies on several iCloud features to transfer the bulk of your data and settings.
Note that you will need an Apple Account (formerly Apple ID) for this to work.
If you don't have an Apple Account yet, you can create one here (for more information, see How to create a new Apple Account).
The migration process is lengthy, but straightforward.
The first step is to set up your new Mac and synchronize all files in the Desktop and Documents folders:
Set up your new Mac and install all apps.
On your new Mac, sign in to your Apple Account.
Make sure that "Desktop & Documents Folders" in System Settings > Apple Account > iCloud > Drive (in macOS Sonoma or earlier, open System Settings > Apple ID > iCloud > iCloud Drive instead) is disabled:

Purchase an iCloud+ subscription for your Apple Account that exceeds your storage needs (see iCloud+ Plans and Pricing for details).
On your remote Mac:
Check System Settings to make sure that you are logged in with the same Apple Account you use on your new Mac.
Check that iCloud+ is displayed in System Settings > Apple Account > iCloud (in macOS Sonoma or earlier, open System Settings > Apple ID > iCloud):

As shown in the screenshot, you will probably see that some space is already in use.
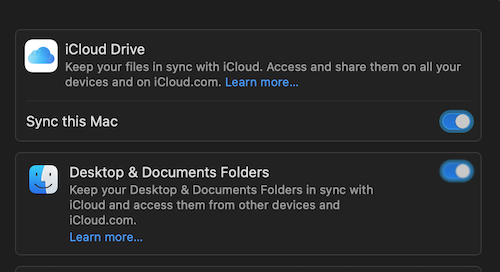
Open System Settings > Apple Account > iCloud > Drive (in macOS Sonoma or earlier, open System Settings > Apple ID > iCloud > iCloud Drive instead) and turn on both "iCloud Drive" and "Desktop and Document Folders":

The synchronization will start immediately and may take several hours to complete.
Wait until all Desktop files and Documents are synchronized. You can check the progress with the "pie chart" status icon next to "iCloud Drive" in the sidebar of a Finder window:

The synchronization is complete when the "pie chart" status icon is no longer shown.
On your new Mac:
Remove all files on the Desktop and in the Documents folder.
Open a Finder window and select iCloud from the sidebar. You should see a folder with the same name as your remote Mac that contains a Desktop and a Documents folder. Copy the contents of those folders to the Desktop resp. the Documents folder on your new Mac.
Wait until all Desktop files and Documents have been copied to iCloud Drive and make some checks to verify that everything was copied.
On your remote Mac, turn off "Desktop & Documents Folders". To free up space to copy other data like movies, music and pictures, delete the Desktop and Documents folders in iCloud Drive.
When you turn off "Desktop & Documents Folders", a new Desktop and Documents folder is created on your Mac in your home folder, so you can safely delete the files in iCloud Drive.
The second step is to copy other files like movies, music and pictures:
On your remote Mac:
Create a folder named "Migration" in iCloud Drive and copy the following folders to "Migration":
- Movies
- Music
- Pictures
- Downloads
plus any other folders you want to migrate, except the Desktop and Documents folders.
Wait until the folders have been copied to iCloud Drive.
You can check the progress with the "pie chart" status icon next to "iCloud Drive" in the sidebar of a Finder window:

The synchronization is complete when the "pie chart" status icon is no longer shown.
If you use Terminal, you may want to compress your shell startup and history files (and any other hidden files of interest to you) and copy the resulting zip file to the “Migration” folder. For example, if you use bash and vi in a regular basis, you may use a command similar to this:
zip ~/Desktop/shell.zip .bashrc .bash_profile .bash_history .viminfo
On your new Mac:
Copy the folders in the "Migration" iCloud Drive folder mentioned in the previous step to the appropriate locations.
Uncompress the zipped shell startup and history files (and any other files you added to the zip file) in the "Migration" folder in iCloud Drive to your home folder.
After copying the folders and files, delete them from iCloud Drive to free up space.
The third step is to copy your settings.
WARNING: This is tricky and may not work correctly, but will hopefully at least transfer Finder and app settings and state. Other settings like printers and scanners can't be tranferred.
On your remote Mac:
Open your home folder in a Finder window, press ShiftCommand. to display all files, locate a folder named Library, open it and select:
- Application Support
- Caches
- Saved Application State
and copy them to "Migration" (created above in iCloud Drive).
You will need to enter an administrator password to copy them.
These are usually large folders and the copy may take a while.
Press ShiftCommand. again to hide hidden files.
On your new Mac:
Open your home folder in a Finder window, press ShiftCommand. to display all files, locate a folder named Library and double-click it.
Make a backup of the following folders:
- Application Support
- Caches
- Saved Application State
by copying them to the Desktop.
You will need to enter an administrator password to copy them.
Open the "Migration" folder in iCloud Drive.
Drag the following folders:
- Application Support
- Caches
- Saved Application State
to the Library folder in your home folder.
When asked whether to replace files, answer yes. If a file can't be copied, skip the file.
Press ShiftCommand. again to hide hidden files.
Open an app (for example Safari) and verify that settings are correct and data (for example bookmarks) are correct.
The fourth step is to copy your passwords:
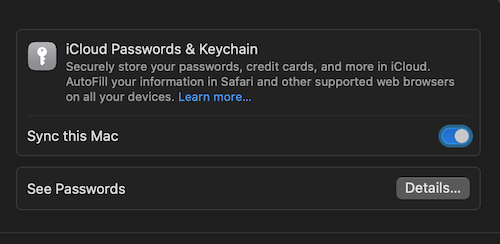
On your remote Mac, check whether "Passwords & Keychain" in System Settings > Apple Account > iCloud (in macOS Sonoma or earlier, open System Settings > Apple ID > iCloud instead) is turned on. If it isn't, enable "Sync this Mac":

In your new Mac, check whether "Passwords & Keychain" in System Settings > Apple Account > iCloud (in macOS Sonoma or earlier, open System Settings > Apple ID > iCloud instead) is turned on. If it isn't, enable "Sync this Mac".
Wait a couple of minutes (or proceed right away if the settings were already turned on on both Macs), open Safari, visit a site for which you have a username and password and verify that Safari suggests a password.
If the password is not available, see this Apple support article: If iCloud Keychain won't turn on or sync.
You can now delete the “Migration”, “Desktop” and “Documents” folders in iCloud Drive, and cancel your iCloud+ subscription.
Caveats
To the best of my knowledge, the procedure described above should transfer documents, movies, music and pictures without much trouble, bur app settings, as mentioned above, may not be transferred correctly, and may even corrupt your app settings on your new Mac.
System-wide settings can”t be transferred with this procedure.


