1

I have an older, MacBook Pro (15-inch, Mid 2009) that I intend to give as a gift.

For security reasons, I decided that I was a good to format the drive and reinstall OS X El Capitan.

My first effort was thwarted by an error:

This item is temporarily unavailable.Try again later.

After reading Wiped drive, now can’t reinstall El Capitan from Recovery because the “item is temporarily unavailable”, I supplied a different set of icloud credentials, and the process continued.

Eventually, however, the installation failed with a different message:

No packages were eligible for install. Contact the software manufacturer for assistance. Quit the installed to restart your computer and try again.

I tried using "Internet Recovery" (Option+Command+R) and a bootable USB drive that contained El Capitan, both of which ultimately failed with the same message.

Is there a way to get this to work?

To create a bootable USB drive, I needed the Install OS X El Capitan.app package.

Using my MBP 16", I used the Download OS X El Capitan link on Apple's support site to get the installer.

Unfortunately, running the InstallMacOSX.pkg package in the DMG failed:

This version of OS X 10.11 cannot be installed on this computer.

I 'found' a Install OS X El Capitan.app package and was able to create the bootable media.

3

2 Answers 2

6

The accepted answer to the question (How can I download an older version of OS X/macOS?) that @nohillside suggested contained the ultimate solution--essentially the computer's date needed to be within a year of the OS' release.

Wikipedia's article on OS X El Capitan indicated that:

OS X El Capitan was released to end users on September 30, 2015, as a free upgrade through the Mac App Store.

Based on this knowledge, I changed the computer's system date to 2/1/2016 12:00:00 @ UTC using Terminal:

$ date -u 020100002016

Once the system's date was changed, the installation completed as desired.

1
  • This worked for me as well. The only caveat I'll add is that you must be booting/installing from a USB drive, with the network unplugged/disabled. On my first attempt, after installing a new hard drive, installation got as far as creating the recovery partition, and then failed. Trying to re-install from that partition would fail as well, even with the date change, because it would attempt to download updates, during which I assume Apple noticed the discrepancy and halted it.
    – gbanks
    Commented Aug 22, 2020 at 23:10
1

There is a link on the Apple website How to upgrade to OS X El Capitan that will download a file that can be used to create the Install OS X El Capitan application. However, if the model Mac is too new to allow the installation for El Capitan, then message given below will occur when trying to create the Install OS X El Capitan application.

This version of OS X 10.11 cannot be installed on this computer.

If you are trying to create a USB installation flash drive of use on another Mac computer, then you can still using the download file to create this installer. The instructions are given below.

The following steps can be used to create a USB installer for El Capitan.

This method was verified 2 days ago (4/17/20) by user Tak using Catalina on a MacBook Pro 2017 touchbar for use on iMac 2009 24”.

  1. Use instructions on the Apple website How to upgrade to OS X El Capitan to download InstallMacOSX.dmg.
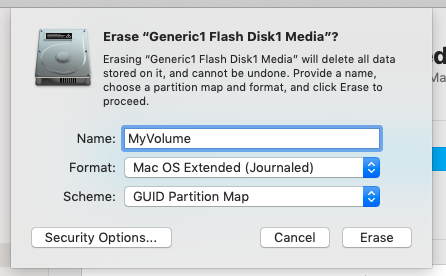
  2. Erase a 16 GB or larger flash drive. Use the setting shown in the image below.

  3. Use the Finder applicaition to open InstallMacOSX.dmg.
  4. Enter the commands given below. A folder named El Capitan will be created on the desktop to hold temporary files.

    Note: The easiest way to enter the commands is to copy from this document and paste in the Terminal window.

    pkgutil --expand /Volumes/Install\ OS\ X/InstallMacOSX.pkg ~/Desktop/El\ Capitan
    diskutil eject Install\ OS\ X
    cd ~/Desktop/El\ Capitan
    hdiutil attach InstallMacOSX.pkg/InstallESD.dmg  -noverify -nobrowse -mountpoint /Volumes/esd
    sudo asr restore -source /Volumes/esd/BaseSystem.dmg -target /Volumes/MyVolume -noprompt -noverify -erase
    diskutil rename OS\ X\ Base\ System Install\ El\ Capitan
    rm /Volumes/Install\ El\ Capitan/System/Installation/Packages
    cp -rp /Volumes/esd/Packages /Volumes/Install\ El\ Capitan/System/Installation
    cp -rp /Volumes/esd/BaseSystem.chunklist /Volumes/Install\ El\ Capitan/
    cp -rp /Volumes/esd/BaseSystem.dmg /Volumes/Install\ El\ Capitan/
    hdiutil detach /Volumes/esd
    sudo bless --folder /Volumes/Install\ El\ Capitan/System/Library/CoreServices --label Install\ El\ Capitan
    cp /Volumes/Install\ El\ Capitan/Install\ OS\ X\ El\ Capitan.app/Contents/Resources/InstallAssistant.icns /Volumes/Install\ El\ Capitan/.VolumeIcon.icns
    diskutil eject Install\ El\ Capitan


  5. Remove the flash drive

  6. Drag the El Capitan folder from the desktop to the trash.

References

How do I make a bootable USB flash drive on a Mac?
What is the best way to generate a Yosemite or Mavericks Install USB flash drive?
Install El Capitan with VirtualBox on OS X

1
  • Your instruction on how to create the bootable USB from the PKG file would have been really helpful. Thanks for providing them.
    – craig
    Commented Apr 19, 2020 at 19:56

You must log in to answer this question.

Not the answer you're looking for? Browse other questions tagged .