Use Big Sur screenshots
Source Link

QuickTime X seems to be able to open a .mp4 file, trim it, and re-save as .mp4 with no re-encoding.

This was surprising to me, as the only way to Export the file is via a filetype change to .mov.

If you take other actions such as Add Clip to End..., the menu item for Save will become greyed out and you will be forced to export as .mov if you wish to save. If you Split Clip more than one time without deleting a segment it similarly prevents the save.

But this does enable easy trimming and re-saving without .mov conversion using Quicktime X.

Trim .mp4 video file:

  1. Open a .mp4 with QuickTime Player X
  2. Scrub to a location in the file. Use the keyboard arrow controls for frame-perfect accuracy.
  3. Press Split Clip CMDY to cut the video into two segments.
  4. Select the unwanted segment. Press delete to delete.

Note: You can also use the Trim CMDT command. But I find it is almost impossible to accurately set the In/Out markers without keyboard arrow controls, which do not function in the Trim UI. Instead, use Split Clip to delete each end of the trim.

Save without re-encoding

  1. Press Save CMDS
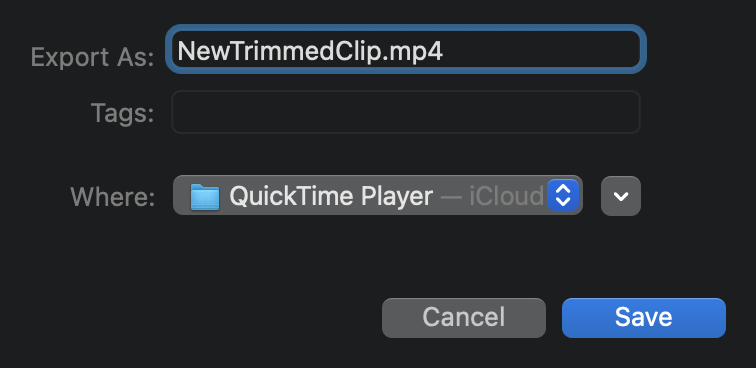
  2. A "Save As..." dialog will pop up.
  3. Note that it is exporting as .mp4. Default value: Export As: Untitled.mp4
  4. Rename your file and save.
  5. Resulting format will be same file type and dimensions as your source file. Its file size should also be smaller, depending on how much was trimmed.

Export As:Export As:

Export As...

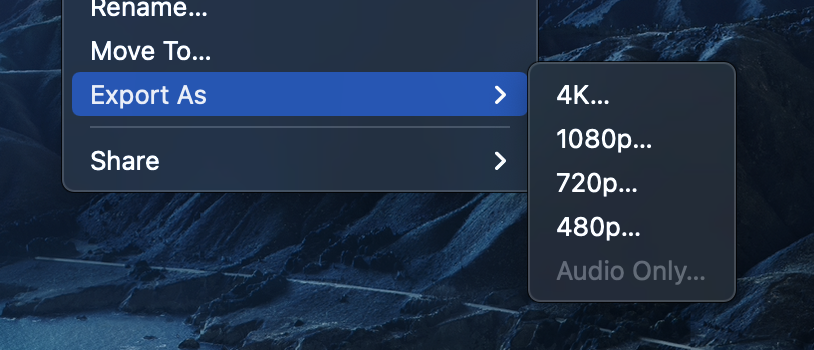
Note that the Export As... menu does NOT contain "pass through" or "original" or any good option.

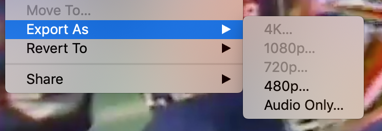
When you select 480p you are only able to export as a .mov file.

Use Save rather than Export, which will allow you to re-save as a .mp4.

Export As is NOT goodExport As is NOT good

QuickTime X seems to be able to open a .mp4 file, trim it, and re-save as .mp4 with no re-encoding.

This was surprising to me, as the only way to Export the file is via a filetype change to .mov.

If you take other actions such as Add Clip to End..., the menu item for Save will become greyed out and you will be forced to export as .mov if you wish to save. If you Split Clip more than one time without deleting a segment it similarly prevents the save.

But this does enable easy trimming and re-saving without .mov conversion using Quicktime X.

Trim .mp4 video file:

  1. Open a .mp4 with QuickTime Player X
  2. Scrub to a location in the file. Use the keyboard arrow controls for frame-perfect accuracy.
  3. Press Split Clip CMDY to cut the video into two segments.
  4. Select the unwanted segment. Press delete to delete.

Note: You can also use the Trim CMDT command. But I find it is almost impossible to accurately set the In/Out markers without keyboard arrow controls, which do not function in the Trim UI. Instead, use Split Clip to delete each end of the trim.

Save without re-encoding

  1. Press Save CMDS
  2. A "Save As..." dialog will pop up.
  3. Note that it is exporting as .mp4. Default value: Export As: Untitled.mp4
  4. Rename your file and save.
  5. Resulting format will be same file type and dimensions as your source file. Its file size should also be smaller, depending on how much was trimmed.

Export As:

Export As...

Note that the Export As... menu does NOT contain "pass through" or "original" or any good option.

When you select 480p you are only able to export as a .mov file.

Use Save rather than Export, which will allow you to re-save as a .mp4.

Export As is NOT good

QuickTime X seems to be able to open a .mp4 file, trim it, and re-save as .mp4 with no re-encoding.

This was surprising to me, as the only way to Export the file is via a filetype change to .mov.

If you take other actions such as Add Clip to End..., the menu item for Save will become greyed out and you will be forced to export as .mov if you wish to save. If you Split Clip more than one time without deleting a segment it similarly prevents the save.

But this does enable easy trimming and re-saving without .mov conversion using Quicktime X.

Trim .mp4 video file:

  1. Open a .mp4 with QuickTime Player X
  2. Scrub to a location in the file. Use the keyboard arrow controls for frame-perfect accuracy.
  3. Press Split Clip CMDY to cut the video into two segments.
  4. Select the unwanted segment. Press delete to delete.

Note: You can also use the Trim CMDT command. But I find it is almost impossible to accurately set the In/Out markers without keyboard arrow controls, which do not function in the Trim UI. Instead, use Split Clip to delete each end of the trim.

Save without re-encoding

  1. Press Save CMDS
  2. A "Save As..." dialog will pop up.
  3. Note that it is exporting as .mp4. Default value: Export As: Untitled.mp4
  4. Rename your file and save.
  5. Resulting format will be same file type and dimensions as your source file. Its file size should also be smaller, depending on how much was trimmed.

Export As:

Export As...

Note that the Export As... menu does NOT contain "pass through" or "original" or any good option.

When you select 480p you are only able to export as a .mov file.

Use Save rather than Export, which will allow you to re-save as a .mp4.
Export As is NOT good

Source Link
pkamb
  • 9.4k
  • 15
  • 74
  • 120

QuickTime X seems to be able to open a .mp4 file, trim it, and re-save as .mp4 with no re-encoding.

This was surprising to me, as the only way to Export the file is via a filetype change to .mov.

If you take other actions such as Add Clip to End..., the menu item for Save will become greyed out and you will be forced to export as .mov if you wish to save. If you Split Clip more than one time without deleting a segment it similarly prevents the save.

But this does enable easy trimming and re-saving without .mov conversion using Quicktime X.

Trim .mp4 video file:

  1. Open a .mp4 with QuickTime Player X
  2. Scrub to a location in the file. Use the keyboard arrow controls for frame-perfect accuracy.
  3. Press Split Clip CMDY to cut the video into two segments.
  4. Select the unwanted segment. Press delete to delete.

Note: You can also use the Trim CMDT command. But I find it is almost impossible to accurately set the In/Out markers without keyboard arrow controls, which do not function in the Trim UI. Instead, use Split Clip to delete each end of the trim.

Save without re-encoding

  1. Press Save CMDS
  2. A "Save As..." dialog will pop up.
  3. Note that it is exporting as .mp4. Default value: Export As: Untitled.mp4
  4. Rename your file and save.
  5. Resulting format will be same file type and dimensions as your source file. Its file size should also be smaller, depending on how much was trimmed.

Export As:

Export As...

Note that the Export As... menu does NOT contain "pass through" or "original" or any good option.

When you select 480p you are only able to export as a .mov file.

Use Save rather than Export, which will allow you to re-save as a .mp4.
Export As is NOT good