Aquire the Boot Camp Support Software (the drivers). The software can either be downloaded using the Boot Camp Assistant, downloaded directly from the Web or copied off a OS X installation DVD. See System requirements to install Windows on your Mac via Boot Camp for details. This procedure does not require the use of a flash drive. If your Boot Camp Support Software is stored on a flash drive, then follow the special instructions given in certain step that follow.
Make sure your firmware is up to date. See EFI and SMC firmware updates for Intel-based Macs.
Download and install a free copy of VirtualBox from Oracle. I used VirtualBox, Version 5.0.0 r101573, Copyright © 2015.
Inside your "Documents" folder, create a folder named "VirtualBox". This is where you will keep the files created in the rest of the steps.
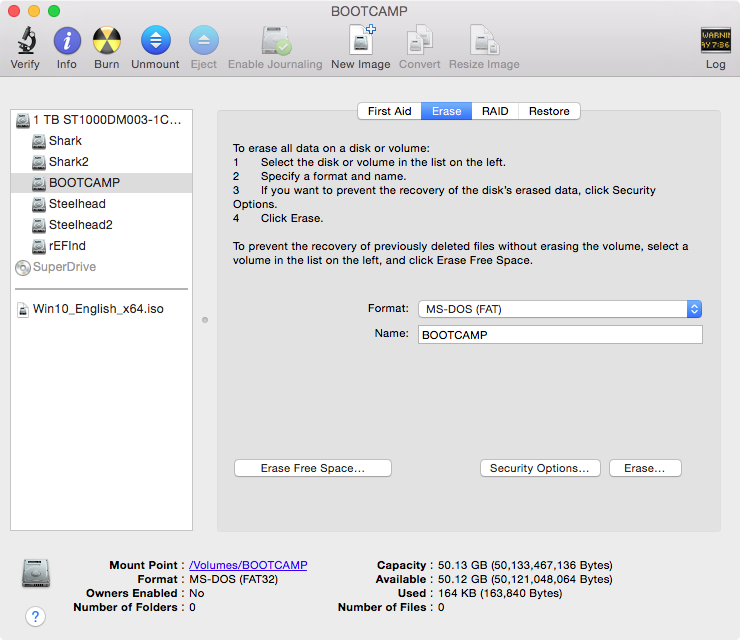
Create a MS-DOS (FAT) formatted partition to install Windows. You can use the Bootcamp Assistant, the Disk Utility, or commands (
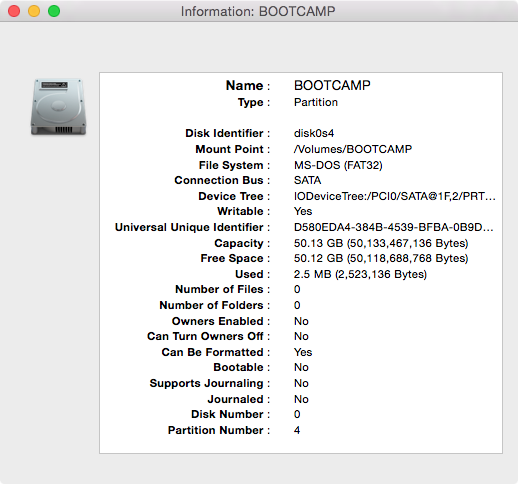
distutil,gptand/orfdisk) entered in a Terminal window. Other third party tools, such asgdisk, can also be used. Give the label for this partition the name "BOOTCAMP".Determine the disk and partition numbers of the partition named "BOOTCAMP". To do this, highlight the partition in the Disk Utility application and click the "Info" button. A popup window should appear. The values shown will be used in the next step.
The information, in this pop up window, shows the disk and partition numbers are 0 and 4, respectively. If your numbers are different, you will need to substitute your numbers in the rest of the steps. If your partition number is greater than 4, then you can not install Windows on this partition. (Technically, this may not be true, but it is beyond the scope of this answer to explain how to do so.)
Do not close the popup window.
Open the Terminal application and enter the following commands in the Terminal window. This will set variables to be used in later commands. In the next command, replace
αwith the "Disk Number" shown in the Disk Utility popup window. The usual value forαis0.DISK0=/dev/diskαIn the next command, replace
βwith the "Partition Number" shown in the Disk Utility popup window. The usual value forβis4.PARTITION=βThe next command sets the variable
PARTIDto the disk identifier of the partition. This should be the same as the "Disk Identifier" shown in the Disk Utility popup window. The usual value forPARTIDisdisk0s4.PARTID="$DISK0"s"$PARTITION"Note: the letter
sis lower case.Close the Disk Utility popup window.
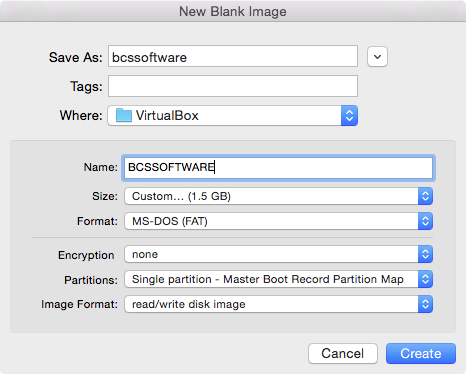
With the Disk Utility application still open, select "File→New→Blank Disk Image..." from the menu bar. In the popup window, enter the values shown below. Note: "Where:" should be the "VirtualBox" folder created in Step 4. If the Boot Camp Support Software is stored on a flash drive, you can use the default "Size:" of "100 MB".
Save As: bcssoftware
Tags:
Where: VirtualBox
Name: BCSSOFTWARE
Size: Custom... (1.5 GB)
Format: MS-DOS (FAT)
Encryption: none
Partitions: Single partition - Master Boot Record Partition Map
Image Format: read/write disk imageThe popup window should appear as shown below.
Click the "Create" button.
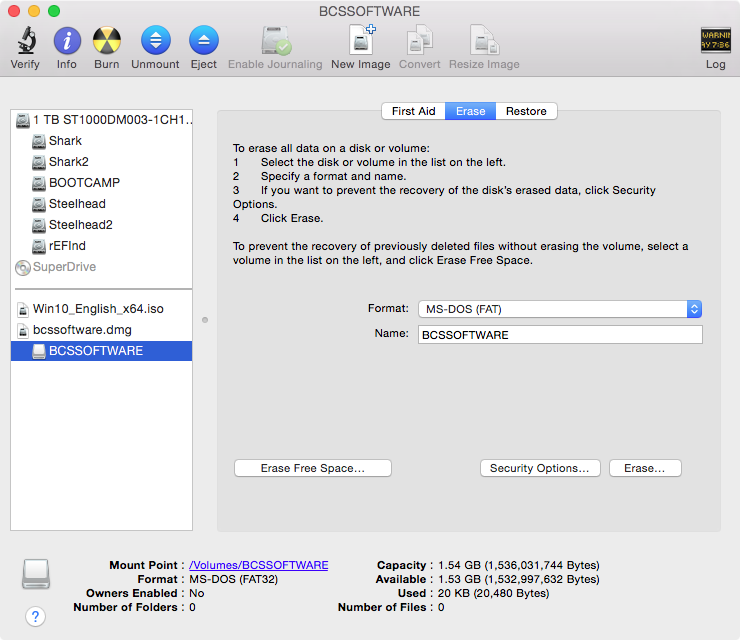
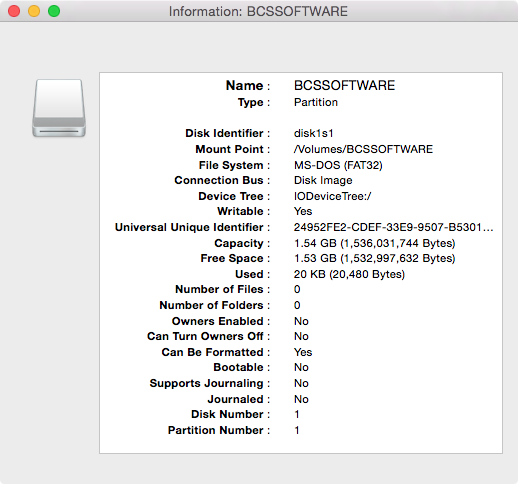
Determine the disk number of the partition named "BCSSOFTWARE". To do this, highlight the partition in the Disk Utility application and click the "Info" button. A popup window should appear. The values shown will be used in the next step.
The information, in this pop up window, shows the disk number is 1. If your number is different, you will need to substitute your number in the rest of the steps.
Do not close the popup window.
Using the same Terminal window, enter the following to set the variable
DISK1. Replaceγwith the "Disk Number" shown in the Disk Utility popup window. The usual value forγis1.DISK1=/dev/diskγ
DISK1=/dev/diskγQuit the Disk Utility.
Copy the Boot Camp Support Software to to the partition labeled "BCSSOFTWARE". I used the Finder application to do this. You can skip this step, if this software is already stored on a flash drive.
Mark your partition as active in the MBR by entering the following in the same Terminal window. The input for the interactive command
fdiskis taken from the variableINPUT. If a password is asked for, enter it.INPUT=$(printf "f $PARTITION\nw\ny\nq") sudo fdisk -e $DISK0 <<<"$INPUT"
INPUT=$(printf  "f  $PARTITION\nw\ny\nq")
sudo  fdisk  -e  $DISK0  <<<"$INPUT"
Note: To display the value for the variable
INPUT, use the commandecho "$INPUT".Allow VirtualBox read/write access to your physical partition by entering the following commands in the same Terminal window. If a password is asked for, enter it.
diskutil  unmount  $PARTID
sudo  chmod  go+rw  $PARTID
diskutil unmount $PARTID sudo chmod go+rw $PARTIDThis will allow VirtualBox to install Windows on your physical partition. Note: This access will only last until OS X is rebooted.
Create the files that map the virtual partition and disk to the physical partition and disk image. In the same Terminal window, enter the following commands.
cd  ~/documents/virtualbox
sudo  vboxmanage  internalcommands  createrawvmdk  -filename  "$PWD/bootcamp.vmdk"  -rawdisk  $DISK0  -partitions  $PARTITION
sudo  chown  $USER  bootcamp*.vmdk
diskutil unmountDisk $DISK1
vboxmanage  internalcommands  createrawvmdk  -filename  "$PWD/bcssoftware.vmdk"  -rawdisk  $DISK1
Note: If a password is asked for, enter it.
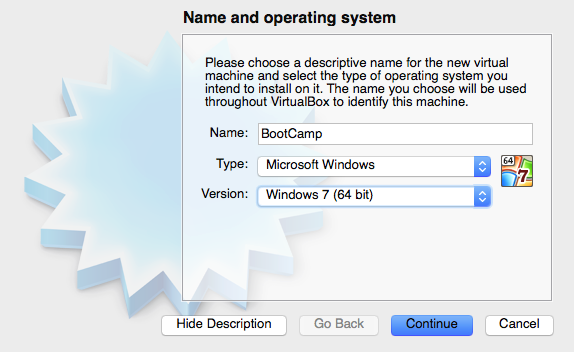
cd ~Open the VirtualBox application and click on icon above the New label. Enter or select the values shown below, then click the "Continue" button.
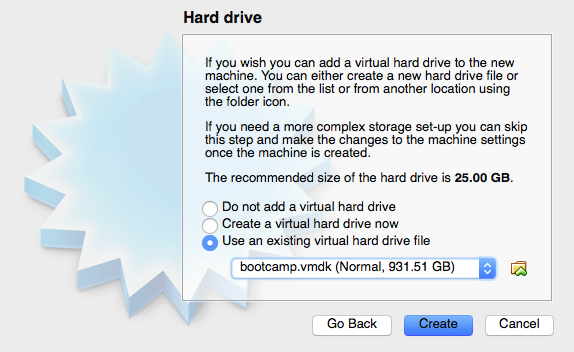
Use the default settings except for the hard drive. Choose the "Use an existing virtual hard drive file" button. Navigate to the VirtualBox folder created in step 4. Open the "bootcamp.vmdk" file. Your window should appear similar to what is shown below.
Click the "Create" button.
Enter the following command in the same Terminal window.
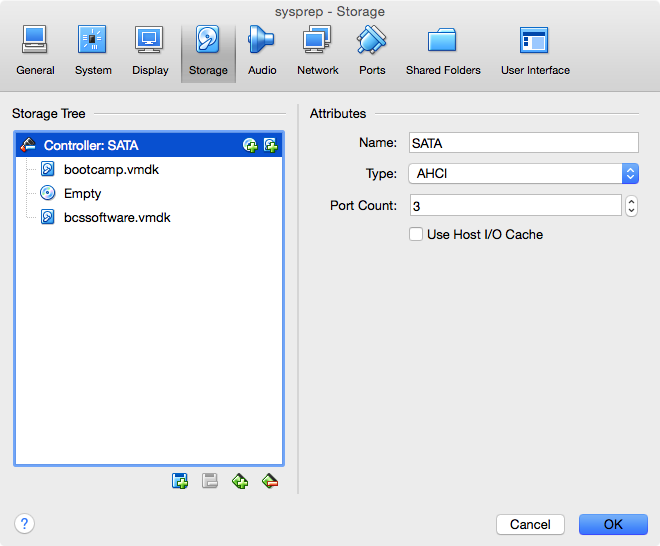
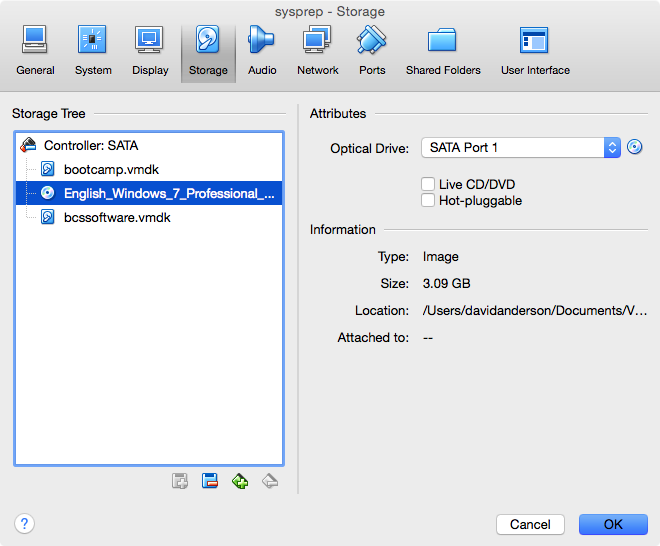
diskutil unmountDisk $DISK1Return to the VirtualBox application's "Oracle VM Virtual Manager" window and click on the icon above the "Settings" label. Next, click on the icon above the "Storage" label. Right click on "Controller: SATA" and select "Add Hard Disk". Choose existing disk by opening the file "bcssoftware.vmdk" stored in the folder created in step 14. The attachment "bcssoftware.vmdk" should appear as shown below.
It has been reported by other users that the "Use Host I/O Cache" box needs to be checked on if VirtualBox boot fails with error
VERR_NOT_SUPPORTED.Highlight the Empty CD/documentsDVD and select "Choose a virtual CD/virtualboxDVD sudo vboxmanage internalcommands createrawvmdk -filename "$PWDfile..." to attach your Windows installation iso file. (Hint: Look for the CD/bootcampDVD icons)
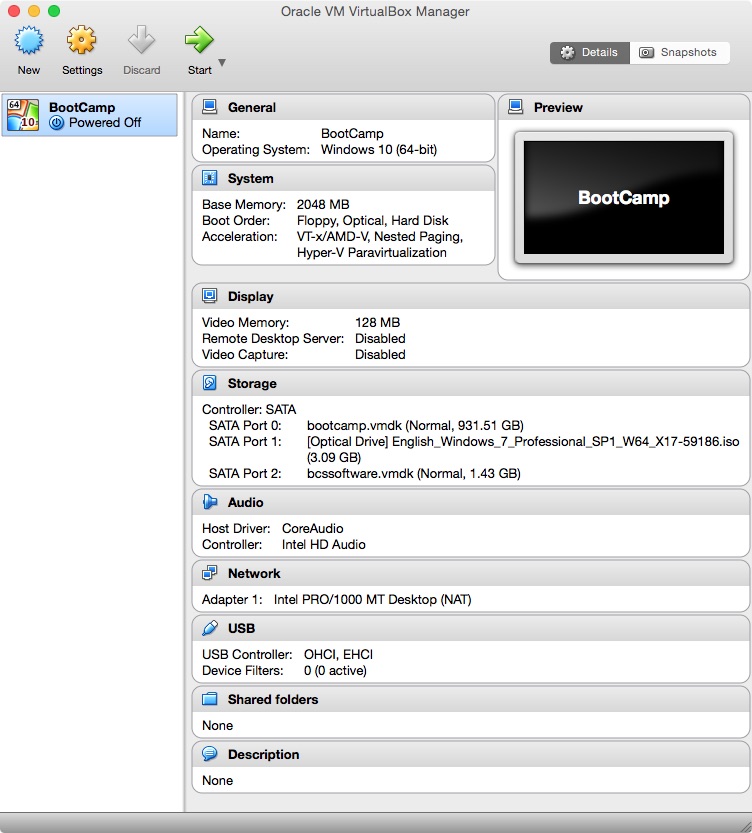
Click OK to close the window.vmdk" Your "Oracle VM Virtual Manager" window should appear similar to what is shown below.
Before clicking the icon above the "Start" label to begin installing Windows, enter the following command in the same Terminal window.
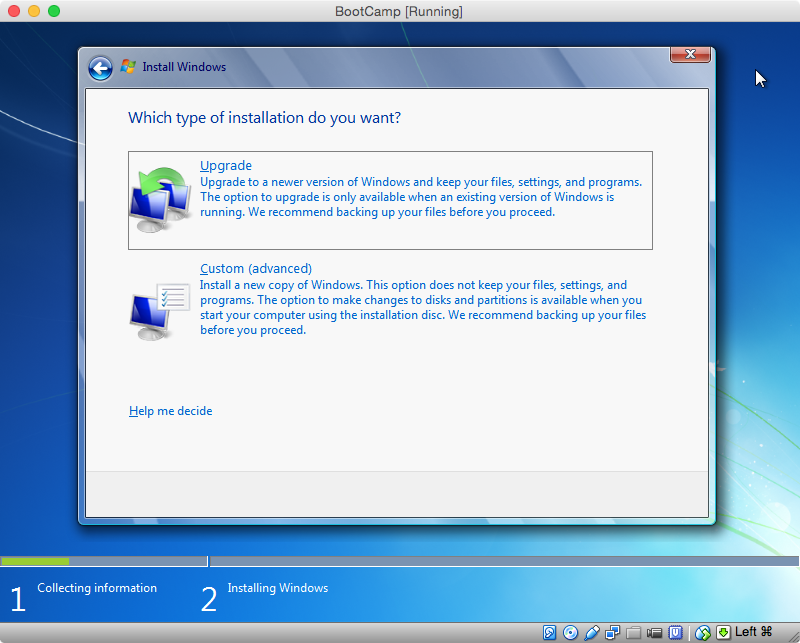
diskutil unmountDisk $DISK1When you reach the window shown below, select "Custom (advanced)".
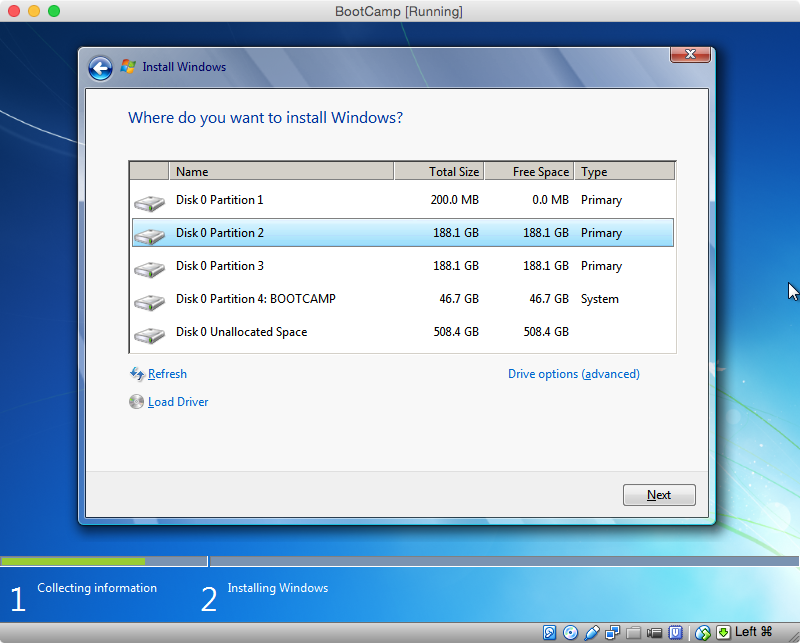
In the next window, click on "Drive options (advanced)".
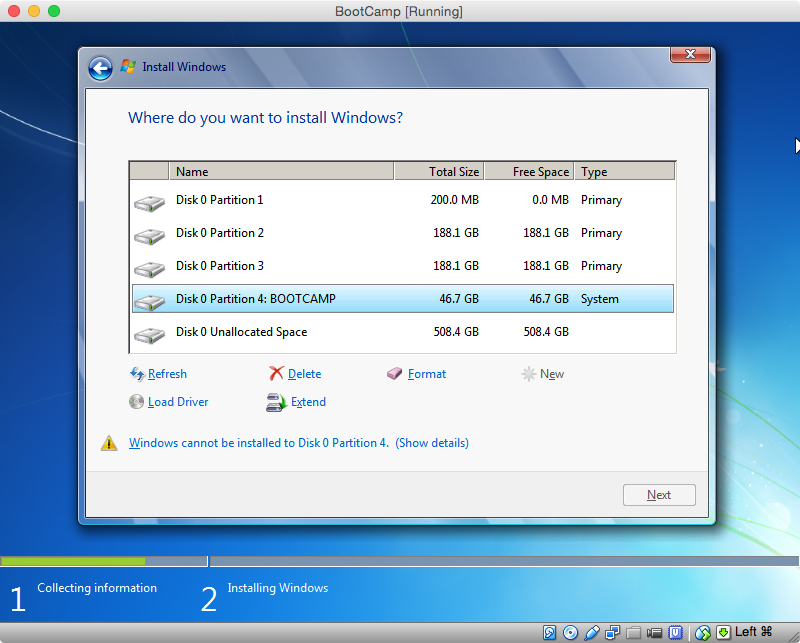
Select the "BOOTCAMP" partition and click on "Format". The error message shown below will disappear. Click on "Next" to continue installation.
The rest the virtual machine installation will be repeated again after booting Windows on the physical machine. Use the provided answers when the following windows first appear. When asked a second time, you can provide your own answers.
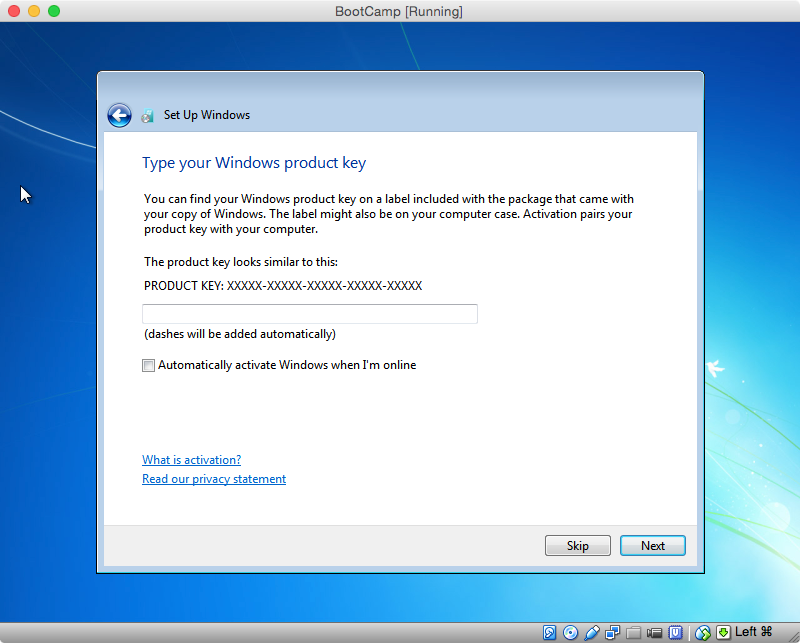
When the following window first appears, I would enter the Product Key and uncheck the "Automatically active Windows when I'm online" box.
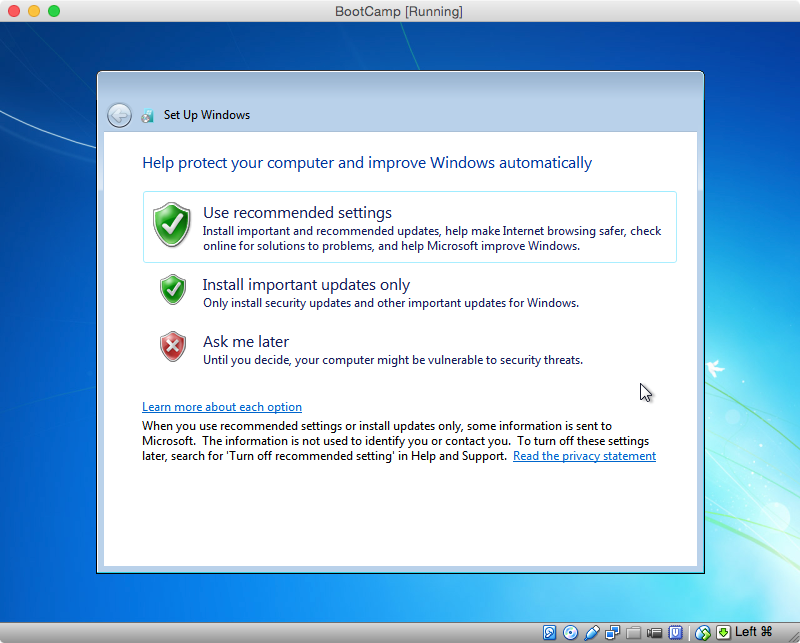
To be safe, I would not let any updates download or install until after the Boot Camp Support Software (the drivers) is installed. Therefore, I would click on "Ask me later" in the window shown below.
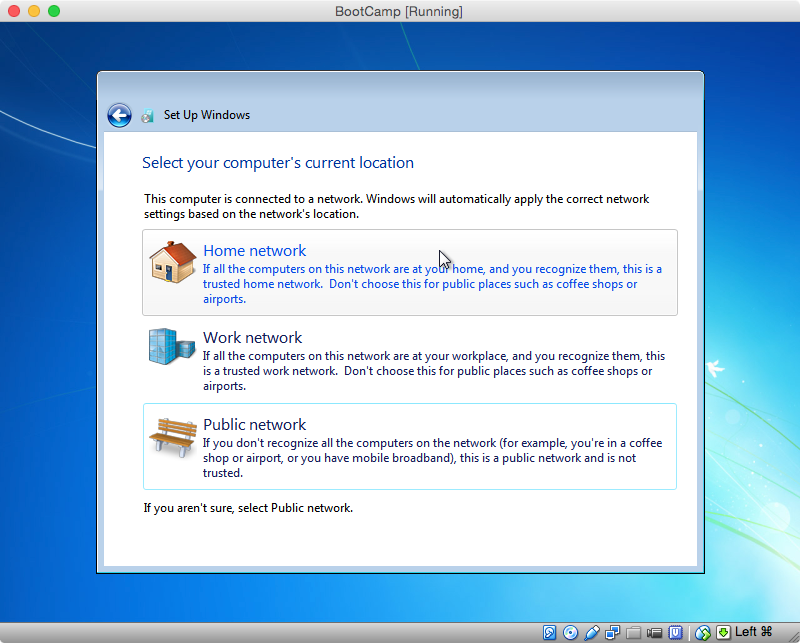
VirtualBox creates a virtual Public network for your virtual machine. Therefore I would click on "Public network" in the window shown below.
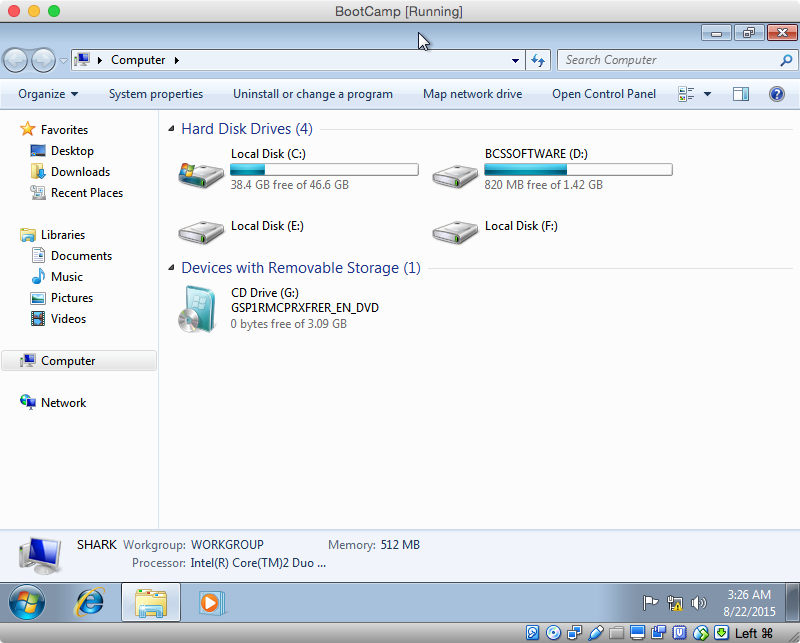
Once the installation has completed on the virtual machine, you need complete the following instructions to make a copy the MBR bootstrap code. From the Start Menu, select "Computer" to open a window containing the hard disk drives and devices with removable storage. Determine the drive letters for the hard disk drive labeled "BCSSOFTWARE" and the CD (optical) drive. The image below shows the drive letters on my computer are
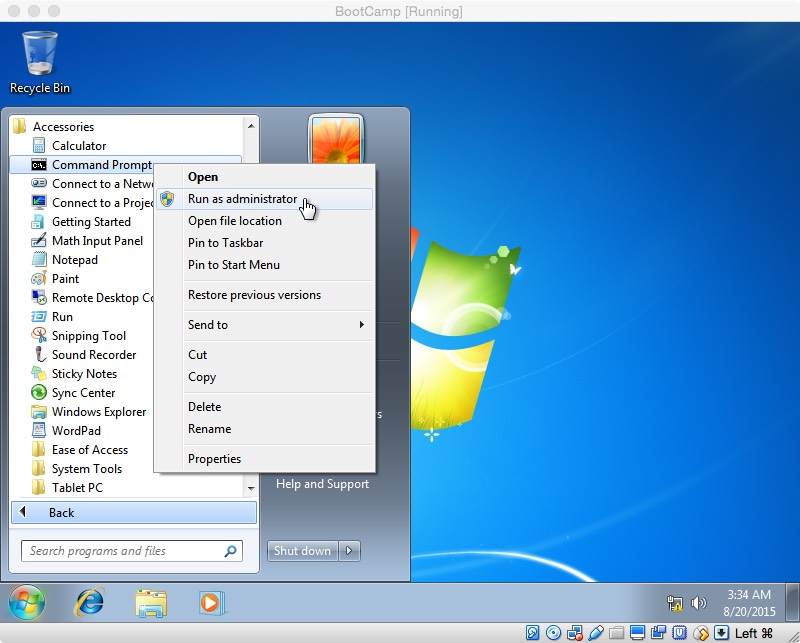
D:andG:, respectively. Your drive letters may differ from mine.Close the window and open a Command Prompt window run as an administrator. Select "Start Menu→All Programs→Accessories", then right click on "Command Prompt" and select "Run as administrator", as shown in the image below.
In the Command Prompt window, enter the command shown below. If necessary, substitute your drive letters for
G:andD:.G:\BOOT\BOOTSECT /NT60 D: /MBRThe results of running this command on my computer are shown below.
Close the Command Prompt window.
Copy the Boot Camp Support Software from the partition labeled "BCSSOFTWARE" to the "C:\Users\Public\Public Documents" folder. I used the Windows Explorer to do this. You can skip this step, if this software is already stored on a flash drive.
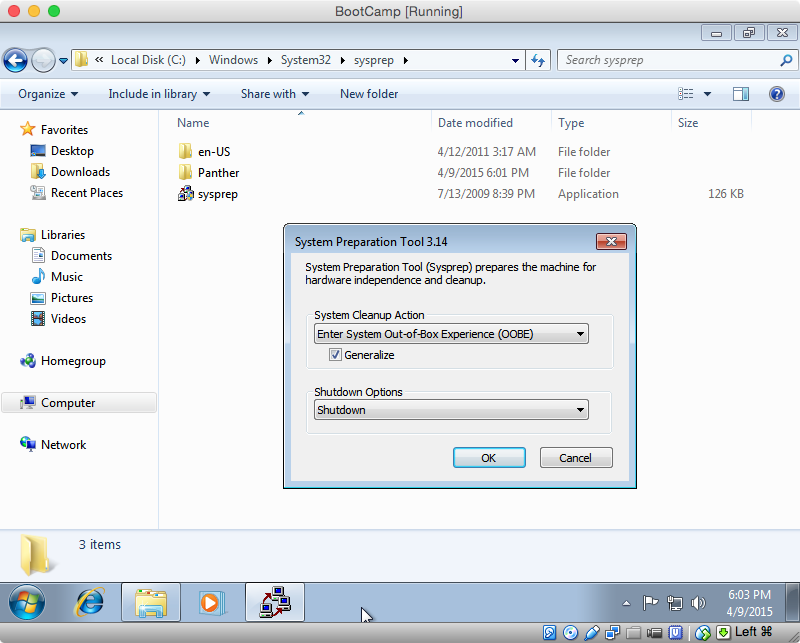
You need to prepare Windows to run on your physical Mac. Open the Windows Explorer and navigate to the "C:\Windows\System32\sysprep" folder. Open the "sysprep" application. Select "Enter System Out-rawdisk $DISK0 of-partitions $PARTITIONBox Experience (OOBE)", "Generalize" and "Shutdown" as shown sudo chown $USER bootcamp*below.vmdk Click OK and wait for the virtual machine to shutdown.
Once the virtual machine has shutdown, quit VirtualBox. Enter the diskutil unmountDisk $DISK1following in the same Terminal window. These commands will update vboxmanage internalcommands createrawvmdk -filename "$PWD/bcssoftwarethe MBR bootstrap code, set the Windows partition identifier to 7 in the MBR and then mount the partition.vmdk" -rawdisk $DISK1 The input for the interactive command
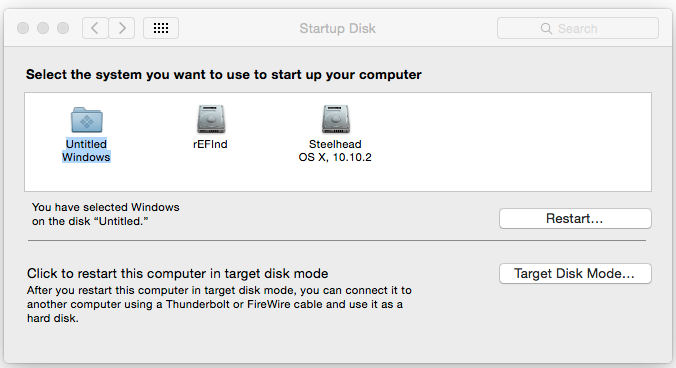
fdiskis taken from the variableINPUT. If a password is asked for, enter it.sudo fdisk -u -y -f $DISK1 $DISK0 INPUT=$(printf "s $PARTITION\n7\nw\ny\nq") sudo fdisk -e $DISK0 <<<"$INPUT" diskutil mount $PARTIDClose all other applications. Open System Preferences and select "Startup Disk". Highlight the "Untitled Windows" icon and click the "Restart" button.
If something goes wrong, you will need to hold down the "option" key at startup to return to OS X. Hopefully, nothing will go wrong and Windows will start.
When Windows finishing installing, install the Boot Camp Support
Software (the drivers). This software is either in the "C:\Users\Public\Public Documents" folder, or on a flash drive.
>Note: If a password is asked for, enter it.
Open the VirtualBox application and click on icon above the New label. Enter or select the values shown below, then click the "Continue" button.
Use the default settings except for the hard drive. Choose the "Use an existing virtual hard drive file" button. Navigate to the VirtualBox folder created in step 4. Open the "bootcamp.vmdk" file. Your window should appear similar to what is shown below.
Click the "Create" button.
Enter the following command in the same Terminal window.
diskutil unmountDisk $DISK1
Return to the VirtualBox application's "Oracle VM Virtual Manager" window and click on the icon above the "Settings" label. Next, click on the icon above the "Storage" label. Right click on "Controller: SATA" and select "Add Hard Disk". Choose existing disk by opening the file "bcssoftware.vmdk" stored in the folder created in step 14. The attachment "bcssoftware.vmdk" should appear as shown below.
It has been reported by other users that the "Use Host I/O Cache" box needs to be checked on if VirtualBox boot fails with error
VERR_NOT_SUPPORTED.Highlight the Empty CD/DVD and select "Choose a virtual CD/DVD file..." to attach your Windows installation iso file. (Hint: Look for the CD/DVD icons)
Click OK to close the window. Your "Oracle VM Virtual Manager" window should appear similar to what is shown below.
Before clicking the icon above the "Start" label to begin installing Windows, enter the following command in the same Terminal window.
diskutil unmountDisk $DISK1
When you reach the window shown below, select "Custom (advanced)".
In the next window, click on "Drive options (advanced)".
Select the "BOOTCAMP" partition and click on "Format". The error message shown below will disappear. Click on "Next" to continue installation.
The rest the virtual machine installation will be repeated again after booting Windows on the physical machine. Use the provided answers when the following windows first appear. When asked a second time, you can provide your own answers.
When the following window first appears, I would enter the Product Key and uncheck the "Automatically active Windows when I'm online" box.
To be safe, I would not let any updates download or install until after the Boot Camp Support Software (the drivers) is installed. Therefore, I would click on "Ask me later" in the window shown below.
VirtualBox creates a virtual Public network for your virtual machine. Therefore I would click on "Public network" in the window shown below.
Once the installation has completed on the virtual machine, you need complete the following instructions to make a copy the MBR bootstrap code. From the Start Menu, select "Computer" to open a window containing the hard disk drives and devices with removable storage. Determine the drive letters for the hard disk drive labeled "BCSSOFTWARE" and the CD (optical) drive. The image below shows the drive letters on my computer are
D:andG:, respectively. Your drive letters may differ from mine.Close the window and open a Command Prompt window run as an administrator. Select "Start Menu→All Programs→Accessories", then right click on "Command Prompt" and select "Run as administrator", as shown in the image below.
In the Command Prompt window, enter the command shown below. If necessary, substitute your drive letters for
G:andD:.G:\BOOT\BOOTSECT /NT60 D: /MBR
The results of running this command on my computer are shown below.
Close the Command Prompt window.
Copy the Boot Camp Support Software from the partition labeled "BCSSOFTWARE" to the "C:\Users\Public\Public Documents" folder. I used the Windows Explorer to do this. You can skip this step, if this software is already stored on a flash drive.
You need to prepare Windows to run on your physical Mac. Open the Windows Explorer and navigate to the "C:\Windows\System32\sysprep" folder. Open the "sysprep" application. Select "Enter System Out-of-Box Experience (OOBE)", "Generalize" and "Shutdown" as shown below. Click OK and wait for the virtual machine to shutdown.
Once the virtual machine has shutdown, quit VirtualBox. Enter the following in the same Terminal window. These commands will update the MBR bootstrap code, set the Windows partition identifier to 7 in the MBR and then mount the partition. The input for the interactive command
fdiskis taken from the variableINPUT. If a password is asked for, enter it.sudo fdisk -u -y -f $DISK1 $DISK0 INPUT=$(printf "s $PARTITION\n7\nw\ny\nq") sudo fdisk -e $DISK0 <<<"$INPUT" diskutil mount $PARTID
Close all other applications. Open System Preferences and select "Startup Disk". Highlight the "Untitled Windows" icon and click the "Restart" button.
If something goes wrong, you will need to hold down the "option" key at startup to return to OS X. Hopefully, nothing will go wrong and Windows will start.
When Windows finishing installing, install the Boot Camp Support
Software (the drivers). This software is either in the "C:\Users\Public\Public Documents" folder, or on a flash drive.

